

Model Context Protocol (MCP) lets ChatGPT and Codex use tools and information from other systems. An MCP server describes the available tools and handles their requests—for example, looking up a ticket or retrieving documentation.
Choose the path that fits your task:
- Build a connection: Use Plugin Creator and Sites to create a plugin for your team’s system.
- Use an existing server: Connect it to ChatGPT or Codex, with setup options for web, desktop, CLI, and IDE.
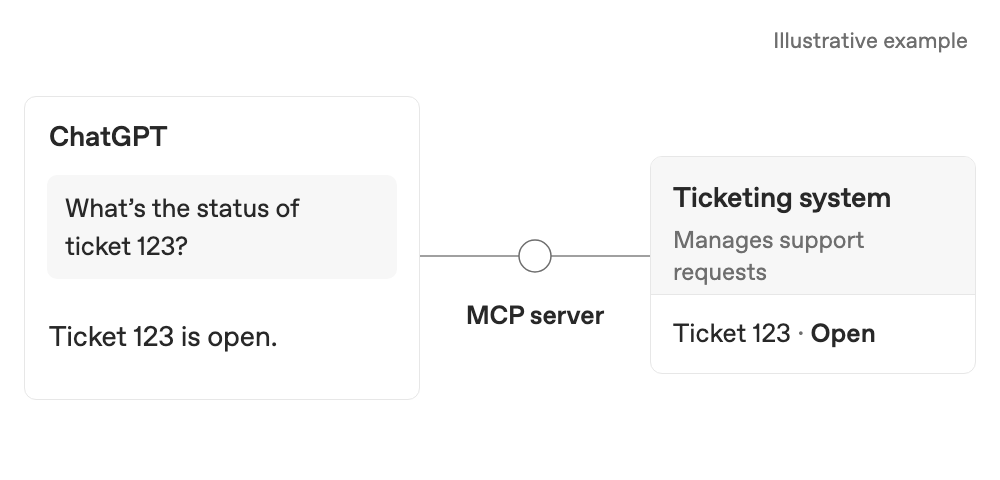
Example: checking a ticket in your team’s support system.
A plugin packages an MCP connection for use in ChatGPT. Plugins can also contain skills with reusable instructions. If you only need instructions, see Build plugins.
Build an MCP plugin with Plugin Creator and Sites
Use Plugin Creator to create and edit your plugin, and Sites to host its MCP server.
Before you start
Check the Plugins directory first. If you need a new connection, gather your system’s API documentation and an approved way to connect. Ask the system owner if you need help.
The example below creates a Support Ticket Lookup plugin. Replace [ticketing system] with your system’s name.
Using ChatGPT Enterprise?
Ask your workspace owner or admin to check Workspace settings → Permissions & roles:
- Use plugins to create, edit, and use plugins. Editing also requires edit access to the plugin.
- Sites access to create and publish your Site.
- Upload plugins and Create plugins with MCPs for the Site owner who publishes the MCP-backed plugin.
Use plugins is on by default; the two MCP publishing permissions are off by default. See Sites access and plugin permissions.
1. Create your plugin
Start a new Work task, select @Plugin Creator, and attach your API documentation. Describe the task:
Still arranging API access? Ask Plugin Creator to use sample data for now.
2. Connect your system
In the same conversation, ask Plugin Creator to connect the server to your system’s API and walk you through sign-in. Use your organization’s approved authentication method, and keep passwords, API keys, and other secrets out of chat.
Need help? Send the Plugin Creator conversation and API documentation to your system owner or developer so they can help set up access.
Connection and hosting details
Sites handles sign-in between ChatGPT and your MCP server. Your server still needs an approved connection to your system’s API, which controls the records and actions it can access.
For another host, follow Build an MCP server, then Connect and test your plugin. See the authentication guide for sign-in setup.
3. Publish and install
Ask Plugin Creator to publish the server with Sites and give you the plugin link, keeping your current access settings. The Site owner must publish to create its plugin; editors should ask the owner to do this.
- Open the plugin card, or find it under Plugins → Personal → Created by you.
- Follow Install and Connect, and complete any required sign-in.
4. Use your plugin
Start a new Work task, choose your plugin with @, and ask “What’s the status of ticket 123?” using a ticket number from your system. You can use its tools alongside other plugins in the same conversation.
Share or edit your plugin
In Business or Enterprise, invite teammates through the plugin’s sharing controls. You need Share plugins permission; listing it in the workspace directory also requires Publish plugins to workspace. See sharing permissions.
Teammates need access to the plugin, its app, and the Site (at least viewer access). Each person installs and connects with their own account. Access to records depends on the server’s API connection.
To edit this Sites-hosted plugin, return to your Plugin Creator conversation, ask it to update the existing Site, and publish the changes. For other editable plugins, choose Edit Plugin to start an editing conversation with Plugin Creator. See Edit an existing plugin.
Replacing a GPT custom action
Show GPT migration steps
GPT custom actions don’t migrate to plugins. Rebuild the connection as a new Sites plugin, reusing the existing API where possible.
Sites creates a separate plugin when you publish; it doesn’t add the connection to your migrated plugin. You can use both plugins in one conversation. Sites plugins don’t currently support editing skills or reference files.
1. Ask the original GPT for a rebuild prompt
Open the original GPT and ask:
2. Check the prompt against the action settings
Before migrating, save the action schema, authentication method, and non-secret connection settings from the GPT editor’s Actions section. Use these to fill gaps in the prompt, or ask the GPT owner for help.
3. Create a new Sites plugin
Start a new task. In Work, select @Plugin Creator; in Codex, use $plugin-creator. Paste the reviewed prompt and attach the schema or API documentation. Ask it to host the server on Sites.
Follow Connect your system and Publish and install, then choose the new plugin in a Work task and ask it to do your original task. See the migration FAQ for details.
Troubleshooting
If the plugin doesn't work as expected
For a connection error or missing tools, check that the Site owner published the latest version and that the plugin is installed and connected. Share any error with Plugin Creator or the server owner.
If ChatGPT doesn’t use the tool, choose the plugin with @ and ask for a specific lookup. If a teammate can’t use it, check their plugin, app, Site, and record access.
If the plugin is marked Desktop only, use a supported desktop app or ask the author to review its packaging. A remote MCP server alone doesn’t make a plugin web-compatible.
Connect an existing MCP server
ChatGPT web uses remote MCP tools through plugins. If you already have a server, follow Connect and test your plugin. Local Codex clients can also connect directly to MCP servers and share their configuration.
Choose your surface to see its setup and configuration options.
The ChatGPT desktop app, Codex CLI, and IDE extension support MCP servers and share MCP configuration for the same Codex host.
The supported server features below apply to MCP servers configured on a Codex host. Hosted plugin tools can have different capabilities.
Supported MCP features
- STDIO servers: Servers that run as a local process (started by a command).
- Environment variables
- Streamable HTTP servers: Servers that you access at an address.
- Bearer token authentication
- OAuth authentication, including Client ID Metadata Documents (CIMD) and Dynamic Client Registration (DCR)
- ChatGPT session authentication for trusted first-party servers
- Server instructions: Codex reads the MCP
instructionsfield returned during initialization and uses it as server-wide guidance alongside the server’s tools.
If you build or maintain an MCP server for Codex, use instructions for cross-tool workflows, constraints, and rate limits that apply across the server. Keep the first 512 characters self-contained so the most important guidance is available when Codex is deciding how to use the server.
Connect Codex to an MCP server
Codex stores MCP configuration in config.toml alongside other Codex configuration settings. By default this is ~/.codex/config.toml, but you can also scope MCP servers to a project with .codex/config.toml (trusted projects only).
The ChatGPT desktop app, Codex CLI, and IDE extension share this configuration. Once you configure your MCP servers, you can switch among those clients without redoing setup.
Configure in the ChatGPT desktop app
- Open Settings, then select MCP servers.
- Select Add server.
- Enter a name, choose STDIO or Streamable HTTP, and provide the server’s command or URL.
- Save the server, then select Restart.
The server list shows which servers are enabled and which require OAuth. Select
Authenticate when an OAuth server requires sign-in. In the composer, type /mcp
to view connected servers.
Use MCP-backed tools in ChatGPT web
Continuing a conversation using Local computer access with Work Cloud on another device doesn’t install plugins or grant access to connected accounts.
In Local computer access with Work Cloud, the enterprise mcp_servers TOML requirement in Agent Security applies to local executors. Cloud containers retain Work Cloud policies. Local MCP servers and transports may not be available in the cloud; check connectivity and authentication separately.
For enterprise hooks in Local computer access with Work Cloud:
- Enterprise hooks. Where enabled for your workspace, Local computer access with Work Cloud supports admin-defined MCP hooks that run on the cloud coordinator (orchestrator) for supported lifecycle and tool events. Command hooks and hooks from local configuration or plugins are not supported with cloud orchestration, even when tools execute locally.
- Auditing. Before relying on these hooks, test the callback connection, confirm the events it receives, and check how failures affect the task. MCP hooks do not provide a complete Compliance API audit trail.
- Limitations: Command hooks and hooks from local configuration or plugins are not supported with cloud orchestration, even when tools execute locally. Consumers do not have hooks support in this feature. When both orchestration and execution are local, existing supported hooks continue to work in local-only Work and Codex threads. Admins can still configure supported managed hooks in Agent Security for those workflows.
See Hooks and the Configuration Reference for support scope.
In a hosted ChatGPT Work chat, install a plugin to use its bundled connectors and remote MCP tools. After installation, Chat and Work can use those tools. Workspace administrators can control which plugins and tools are available.
ChatGPT web doesn’t read local Codex configuration files or expose the local Codex command menu. Open the Plugins tab to browse and manage available tools.
Configure with the CLI
Add an MCP server
codex mcp add <server-name> --env VAR1=VALUE1 --env VAR2=VALUE2 -- <stdio server-command>For example, to add Context7 (a free MCP server for developer documentation), you can run the following command:
codex mcp add context7 -- npx -y @upstash/context7-mcpOther CLI commands
Run codex mcp list to see configured servers. To see all available MCP
commands, run codex mcp --help. For a server that supports OAuth, run
codex mcp login <server-name>.
Terminal UI (TUI)
In the codex TUI, use /mcp to see your active MCP servers.
Configure in the IDE extension
- Open the gear menu, then select MCP servers.
- Select Add server.
- Enter a name, choose STDIO or Streamable HTTP, and provide the server’s command or URL.
- Save the server, then select Restart extension.
The MCP server list shows which servers are enabled and which require OAuth. Select Authenticate when an OAuth server requires sign-in.
Configure with config.toml
For more fine-grained control, edit ~/.codex/config.toml or a project-scoped
.codex/config.toml. See the configuration reference
for a searchable list of every supported MCP option.
Configure each MCP server with a [mcp_servers.<server-name>] table in the configuration file.
STDIO servers
command(required): The command that starts the server.args(optional): Arguments to pass to the server.env(optional): Environment variables to set for the server.env_vars(optional): Environment variables to allow and forward.cwd(optional): Working directory to start the server from.experimental_environment(optional): Set toremoteto start the stdio server through a remote executor environment when one is available.
env_vars can contain plain variable names or objects with a source:
env_vars = ["LOCAL_TOKEN", { name = "REMOTE_TOKEN", source = "remote" }]String entries and source = "local" read from Codex’s local environment.
source = "remote" reads from the remote executor environment and requires
remote MCP stdio.
Streamable HTTP servers
url(required): The server address.auth(optional): Authentication to try after configured bearer tokens and authorization headers. Useoauth(the default) for stored MCP OAuth credentials. Usechatgptto use the current ChatGPT session for the trusted first-party ChatGPT origin, with stored OAuth as a fallback.bearer_token_env_var(optional): Environment variable name for a bearer token to send inAuthorization.http_headers(optional): Map of header names to static values.env_http_headers(optional): Map of header names to environment variable names (values pulled from the environment).http_headers_helper(optional): Local command that prints a JSON object of header names and string values, such as{"X-Auth": "temporary-token"}. Supported for HTTP MCP connections made from the local environment; not for stdio servers or connections made through a remote execution environment.
Codex caches helper headers for the connection. After a same-origin POST
returns 401 or 403, it refreshes the headers once and retries only if the
helper returns changed values. Explicit bearer tokens and OAuth credentials
take precedence over a helper-provided Authorization header.
An OAuth 403 response that reports insufficient scope doesn’t trigger a
helper refresh.
If no credential source resolves, Codex can connect to the server without
authentication. Run codex mcp login <server-name> separately to start an MCP
OAuth login.
Other configuration options
startup_timeout_sec(optional): Timeout (seconds) for the server to start. Default:10.tool_timeout_sec(optional): Timeout (seconds) for the server to run a tool. Default:60.enabled(optional): Setfalseto disable a server without deleting it.required(optional): Settrueto make startup fail if this enabled server can’t initialize.enabled_tools(optional): Tool allow list.disabled_tools(optional): Tool deny list (applied afterenabled_tools).default_tools_approval_mode(optional): Default approval behavior for tools from this server. Supported values areauto,prompt,writes, andapprove. Thewritesmode prompts for tools that aren’t marked read-only.tools.<tool>.approval_mode(optional): Per-tool approval behavior override.tools.<tool>.output_token_limit(optional): Positive token budget for one tool’s output, before the standard 20% serialization allowance. Overrides the model’s default output truncation budget for that tool.
The top-level mcp_optional_startup_grace_ms setting controls how long Codex
waits for optional MCP servers when building the initial tool catalog. It
defaults to 1000 milliseconds. Set it to 0 to wait for each server’s
startup_timeout_sec instead. Required servers still use their startup
timeouts.
OAuth client registration and callbacks
When your authorization server requires a pre-registered OAuth client, provide its client ID when adding the MCP server:
codex mcp add example --url https://mcp.example.com --oauth-client-id my-clientFor a confidential client, also pass --oauth-client-secret. Read the secret
from an environment variable:
codex mcp add example --url https://mcp.example.com --oauth-client-id my-client --oauth-client-secret "$MCP_CLIENT_SECRET"This option requires a nonempty client ID and secret. Codex saves the secret as
mcp_servers.example.oauth.client_secret in config.toml. Keep that file
private and out of version control.
Codex displays the complete callback URL to register with your provider:
OAuth callback URL: http://127.0.0.1/callbackCodex saves the callback alongside the client ID in config.toml for later
logins:
[mcp_servers.example]
url = "https://mcp.example.com"

[mcp_servers.example.oauth]
client_id = "my-client"
callback_url = "http://127.0.0.1/callback"
Newly added pre-registered clients use a stable callback only when the
authorization server advertises
authorization_response_iss_parameter_supported: true and provides a metadata
issuer. If issuer support isn’t advertised, Codex appends a server-specific
callback ID, such as http://127.0.0.1/callback/XuuuHAzzHOni. Existing clients
without a saved callback continue using their callback-ID-specific redirect.
During login, callback selection depends on the OAuth configuration and authorization server metadata:
| OAuth configuration | Issuer support | Callback used |
|---|---|---|
callback_url without client_id |
Supported | The configured callback is used for client registration. |
callback_url without client_id |
Unsupported | The configured callback is used for client registration with the server-specific callback ID appended. |
client_id and callback_url |
Supported | The configured callback is reused; the authorization response must contain the matching iss. |
client_id and a callback_url ending in the correct callback ID |
Unsupported | The configured callback is reused unchanged. |
client_id and a callback_url missing the correct callback ID |
Unsupported | The configured callback is ignored. Codex uses mcp_oauth_callback_url, or http://127.0.0.1/callback when unset, with the callback ID appended. |
client_id without a configured callback_url |
Supported or unsupported | Codex uses the global or default callback with the server-specific callback ID appended. |
The fallback doesn’t modify the stored callback URL. Codex derives the callback ID from the MCP server URL, including its path and query string. The same selection rules apply to automatic and explicit login.
Set mcp_oauth_callback_url when you need a custom callback path or remote
Devbox ingress URL. Newly added pre-registered clients use that URL unchanged
when their provider supports issuer identification. Otherwise, they use the
configured URL with the server-specific callback ID appended. Always register
the exact callback displayed by codex mcp add.
For http://127.0.0.1 callbacks without an explicit port, Codex omits the listener port from
the URL it displays and stores, then inserts the active listener port during
authorization. This substitution doesn’t apply to localhost, IPv6 hosts,
HTTPS URLs, or callbacks that already include a port. Authorization servers
must accept variable loopback ports under
RFC 8252, Section 7.3.
Set mcp_oauth_callback_port to choose a fixed global listener port, or set
mcp_servers.<server-name>.oauth.callback_port to override it for one server.
An explicit port in the callback URL doesn’t configure the listener. For a
direct loopback callback, use http://127.0.0.1 without an explicit port or configure the same
explicit port for both the callback URL and listener. A proxied callback can
intentionally use an external URL port that differs from the local listener
port. Local callback URLs bind to the local interface; non-local callback URLs
bind to 0.0.0.0.
Codex validates any returned iss before exchanging the authorization code. A
mismatched iss always rejects the response. When issuer support is advertised,
a missing iss also rejects it. Neither failure exchanges the code or falls
back to another callback. A malformed callback URL or issuer support advertised
without a metadata issuer also remains a hard failure. See
Authenticate users.
If the MCP server advertises scopes_supported, Codex prefers those
server-advertised scopes during OAuth login. Otherwise, Codex falls back to the
scopes configured in config.toml.
OAuth client registration
Codex supports OAuth Client ID Metadata Documents (CIMD)
and Dynamic Client Registration (DCR). By default, Codex automatically chooses
CIMD when the authorization server advertises
client_id_metadata_document_supported: true, includes none in
token_endpoint_auth_methods_supported, and the callback uses a supported
loopback URL. Otherwise, Codex uses DCR when available. A configured OAuth client
ID always takes precedence and skips client registration.
For CIMD without issuer-bound responses, Codex CLI uses a ChatGPT-hosted metadata document specific to the MCP server:
https://chatgpt.com/oauth/codex/<callback_id>/client.jsonCodex derives <callback_id> from the MCP server URL and includes it in the
loopback redirect URI, such as
http://127.0.0.1:<port>/callback/<callback_id>. The metadata document registers
the matching loopback URI without a port. Authorization servers must accept the
port selected at login while matching the host and path exactly, as required by
RFC 8252. Custom
callback hosts, paths, or query parameters require DCR or a configured OAuth
client ID.
Codex CLI also supports a stable, shared CIMD document:
https://chatgpt.com/oauth/codex/client.jsonCodex CLI uses the stable document with the shared /callback path when the
authorization server advertises
authorization_response_iss_parameter_supported: true, provides a valid
issuer in its metadata, and includes a matching iss in authorization
responses. Servers without issuer-bound responses use the
callback-specific document.
To choose a registration method for one CLI login, use
--oauth-client-registration:
codex mcp login <server-name> --oauth-client-registration cimd
codex mcp login <server-name> --oauth-client-registration dcr
The default is auto. Registration choices apply only to the current login and
aren’t stored in config.toml.
config.toml examples
[mcp_servers.context7]
command = "npx"
args = ["-y", "@upstash/context7-mcp"]
env_vars = ["LOCAL_TOKEN"]

[mcp_servers.context7.env]
MY_ENV_VAR = "MY_ENV_VALUE"
# Optional MCP OAuth callback overrides (used by `codex mcp login`)
mcp_oauth_callback_port = 5555
mcp_oauth_callback_url = "https://devbox.example.internal/callback"[mcp_servers.figma]
url = "https://mcp.figma.com/mcp"
bearer_token_env_var = "FIGMA_OAUTH_TOKEN"
http_headers = { "X-Figma-Region" = "us-east-1" }[mcp_servers.chrome_devtools]
url = "http://localhost:3000/mcp"
enabled_tools = ["open", "screenshot"]
disabled_tools = ["screenshot"] # applied after enabled_tools
default_tools_approval_mode = "prompt"
startup_timeout_sec = 20
tool_timeout_sec = 45
enabled = true
[mcp_servers.chrome_devtools.tools.open]
approval_mode = "approve"
output_token_limit = 30000Plugin-provided MCP servers
Installed plugins can bundle MCP servers in their plugin manifest. Those
servers are launched from the plugin, so user config doesn’t set their
transport command. User config can still control on/off state and tool policy
under plugins.<plugin>.mcp_servers.<server>.
[plugins."sample@test".mcp_servers.sample]
enabled = true
default_tools_approval_mode = "prompt"
enabled_tools = ["read", "search"]

[plugins."sample@test".mcp_servers.sample.tools.search]
approval_mode = "approve"
Plugin-provided HTTP MCP servers can also declare OAuth settings in .mcp.json.
Plugin manifests use the camelCase field names clientId, callbackUrl, and
callbackPort:
{
  "mcpServers": {
    "sample": {
      "type": "http",
      "url": "https://mcp.example.com/mcp",
      "oauth": {
        "clientId": "my-pre-registered-client",
        "callbackUrl": "http://127.0.0.1/callback/registered"
      }
    }
  }
}
Plugin-provided MCP servers follow the same callback-selection rules as other
MCP servers. If a plugin provides a clientId, its provider doesn’t support
issuer-bound callbacks, and callbackUrl lacks the server-specific callback
ID, Codex ignores that URL for the login and uses mcp_oauth_callback_url, or
http://127.0.0.1/callback when unset, with the callback ID appended. The
configured callbackUrl remains unchanged.
A plugin’s oauth.callbackPort overrides the global
mcp_oauth_callback_port; if neither is set, Codex chooses an ephemeral port.
The port embedded in callbackUrl doesn’t select the listener port. For a
direct loopback callback with a fixed port, configure both values to match:
{
  "callbackUrl": "http://127.0.0.1:4321/callback/registered",
  "callbackPort": 4321
}
For remote ingress or another proxy, the callback URL port and local listener port can intentionally differ when the proxy forwards to the configured listener.
Examples of useful MCP servers
The list of MCP servers keeps growing. Here are a few common ones:
- OpenAI Docs MCP: Search and read OpenAI developer docs.
- Context7: Connect to up-to-date developer documentation.
- Figma Local and Remote: Access your Figma designs.
- Playwright: Control and inspect a browser using Playwright.
- Chrome Developer Tools: Control and inspect Chrome.
- Sentry: Access Sentry logs.
- GitHub: Manage GitHub beyond what
gitsupports (for example, pull requests and issues).