
Use the plugin submission portal to submit a plugin for review when you’re ready to publish it for public use.
A plugin is an app, skills, or both. You can submit:
- A skills-only plugin that packages reusable workflows.
- An app-only plugin backed by an MCP server. Custom UI is optional.
- An app-plus-skills plugin that combines an MCP-backed app with bundled skills.
The submission form collects listing information, MCP server details, bundled skills, starter prompts, test cases, country availability, and policy attestations. Which fields you complete depends on whether the plugin includes skills, an app, or both.
For local development, packaging, and marketplace setup, see Build plugins.
For the app portion of the plugin, see Build an app.
Before you submit
Submit the MCP server, not an existing app reference
You will not be able to submit a plugin that references an existing, already-published ChatGPT app. If your plugin includes an app that already exists in ChatGPT, submit that app’s MCP server from scratch through the portal as a new MCP-backed plugin submission. The portal scans that MCP server, validates the tool metadata, and uses the submitted server details during review.
Get plugin submission access
You need an organization role with app management write access before you can create or submit plugin drafts.
- Open OpenAI Platform roles settings.
- Select the organization that owns the plugin.
- Open the role assigned to the submitter, or create a new role.
- In the role permissions, set Apps Management to Write.
- Save the role and assign it to each person who needs to create, edit, or submit plugin drafts.
- Reload the plugin submission portal.
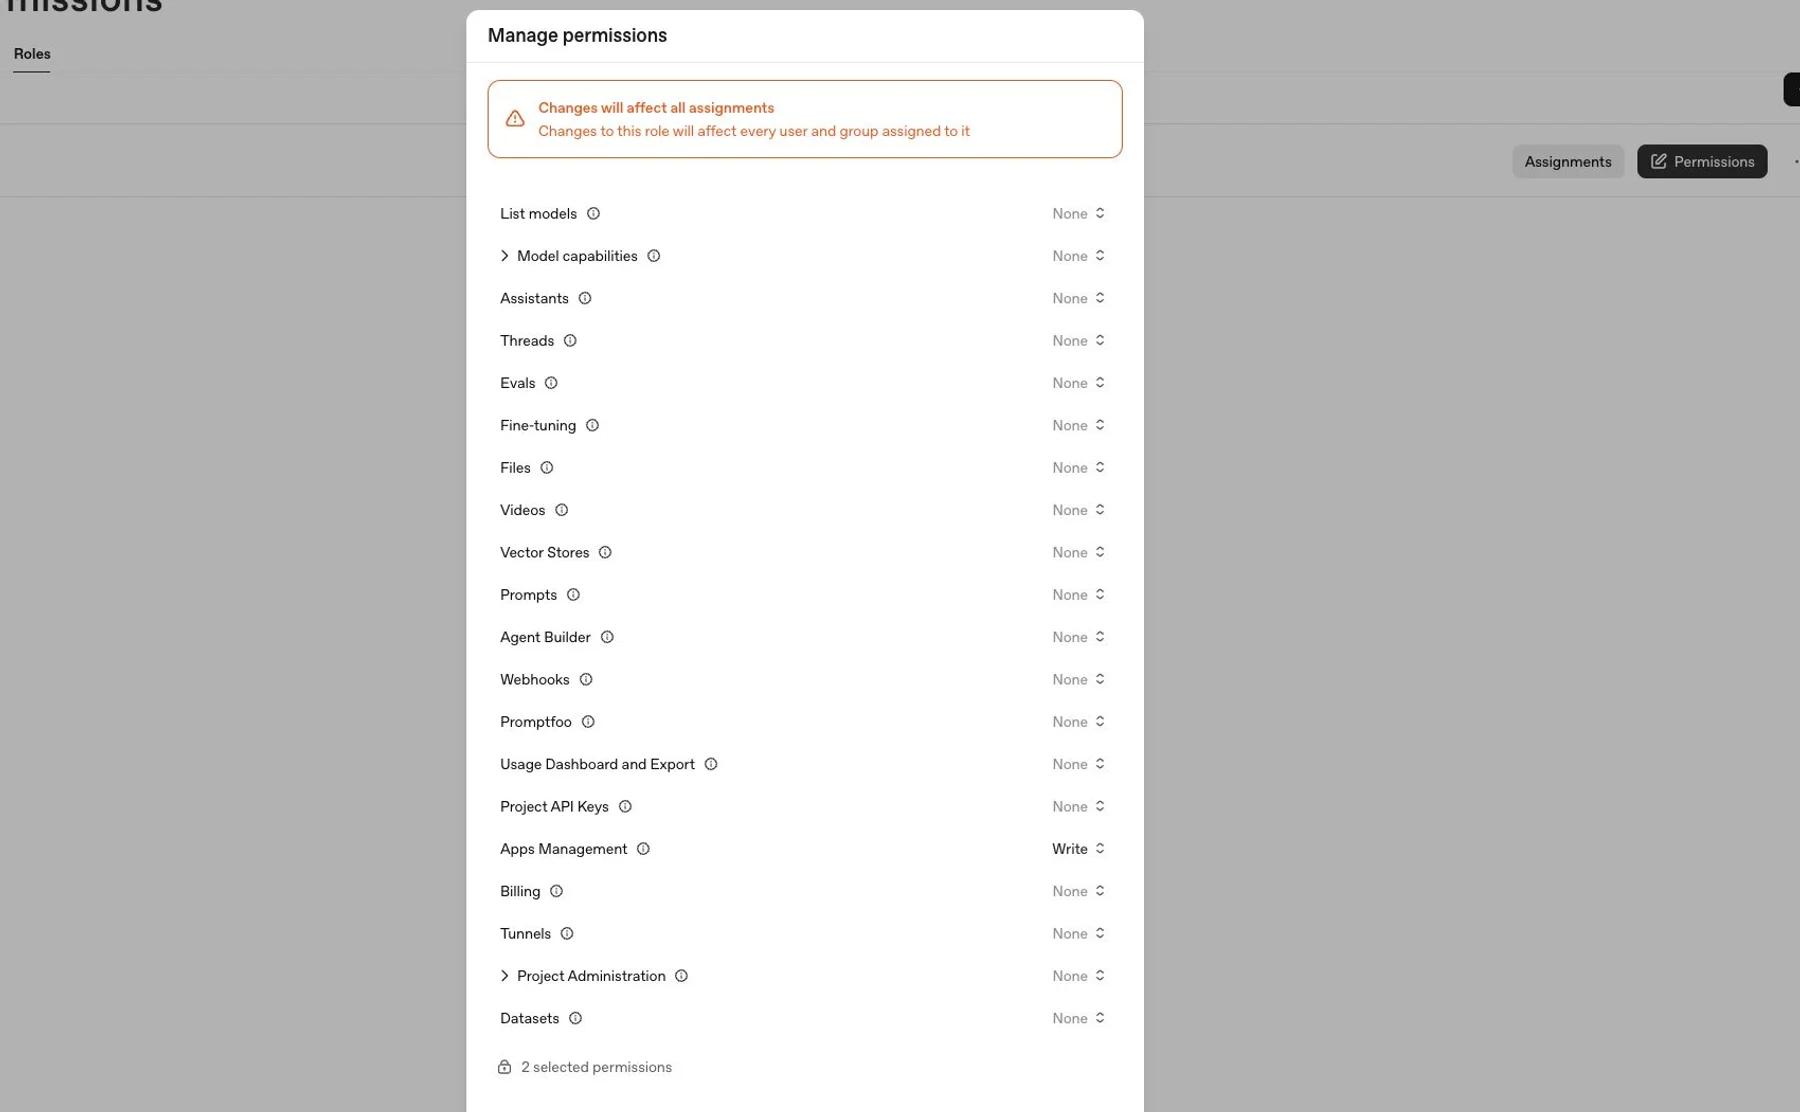
Organization owners already have app management permissions. Non-owner submitters need write access to create or submit drafts, and read access to view drafts and review status.
Verify your developer or business identity
Every public submission must use a verified developer or business identity in the OpenAI Platform. Reviewers use this identity to confirm the submission matches the name, website, support contact, privacy policy, and terms in your public listing.
To verify an identity:
- Sign in to the OpenAI Platform.
- Select the organization that will publish the plugin.
- Open organization settings.
- Complete individual verification if you will publish under your own name, or business verification if you will publish under a company name.
- Return to the plugin submission form and select the verified identity in the Developer Identity field.
Reviewers may reject submissions that use an unverified or mismatched publisher identity. See the Apps SDK organization verification requirements for the underlying review rule.
If the Platform shows that the developer or business identity is verified but the plugin submission form does not recognize it, check that you are submitting from the same organization and project where the identity was verified. The submitter also needs Apps Management write access for that organization. Ask an organization owner or admin to update the submitter’s role, then reload the plugin submission portal.
Prepare required materials
Before opening the form, collect:
| Material | What to prepare |
|---|---|
| Listing details | Plugin name, short description, long description, logo, category, website, support URL, privacy policy URL, and terms URL. |
| Developer identity | Verified individual or business identity in the OpenAI Platform. |
| MCP server | For plugins that contain apps: public MCP server URL, domain verification access, authentication details, demo credentials if needed, content security policy, and accurate tool metadata. |
| Tool annotations | For plugins that contain apps: readOnlyHint, openWorldHint, and destructiveHint values for every MCP tool. |
| Skills | For skills plugins: skill bundle or ZIP with the final skill file tree. |
| Prompts | Starter prompts that show useful, realistic workflows. |
| Test cases | Five positive test cases and three negative test cases with clear expected behavior. |
| Availability | Countries or regions where the plugin should be available. |
| Release notes | A short summary of what you are submitting and what changed since any prior version. |
Create a plugin submission
- Open the plugin submission portal.
- Select Create plugin.
- Choose the submission type:
- Skills only for a plugin that only packages skills.
- With MCP for an app-only plugin backed by an MCP server.
- With MCP for an app-plus-skills plugin that combines an MCP-backed app with bundled skills.
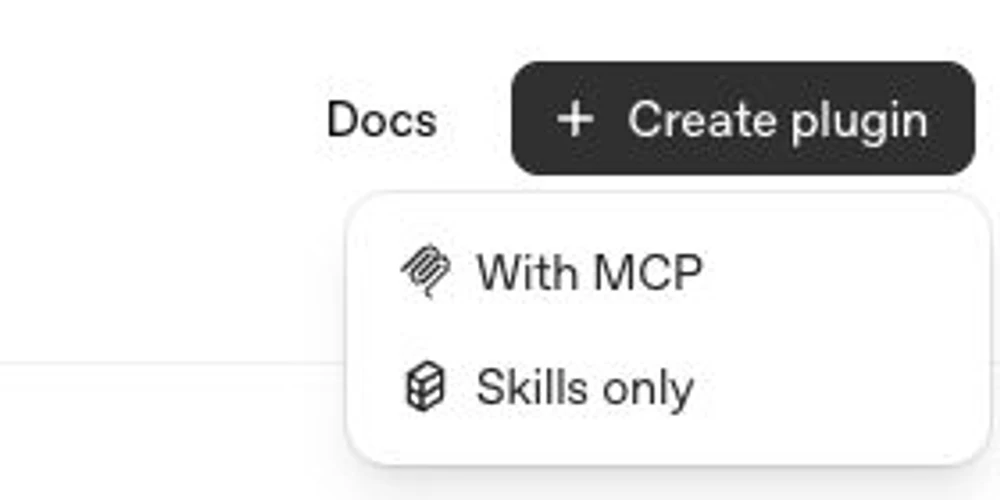
The portal saves the submission as a draft while you complete the form.
Complete the form
Info
Complete the public listing and publisher fields:
- Plugin name: Use the customer-facing product or workflow name.
- Descriptions: Explain what the plugin helps users do. Keep the short description concise and use the long description for workflow details.
- Developer Identity: Select the verified individual or business identity for the publisher.
- Logo and category: Use production-ready brand assets.
- Website, support, privacy, and terms URLs: Use public URLs that match the publisher and disclose relevant data handling.
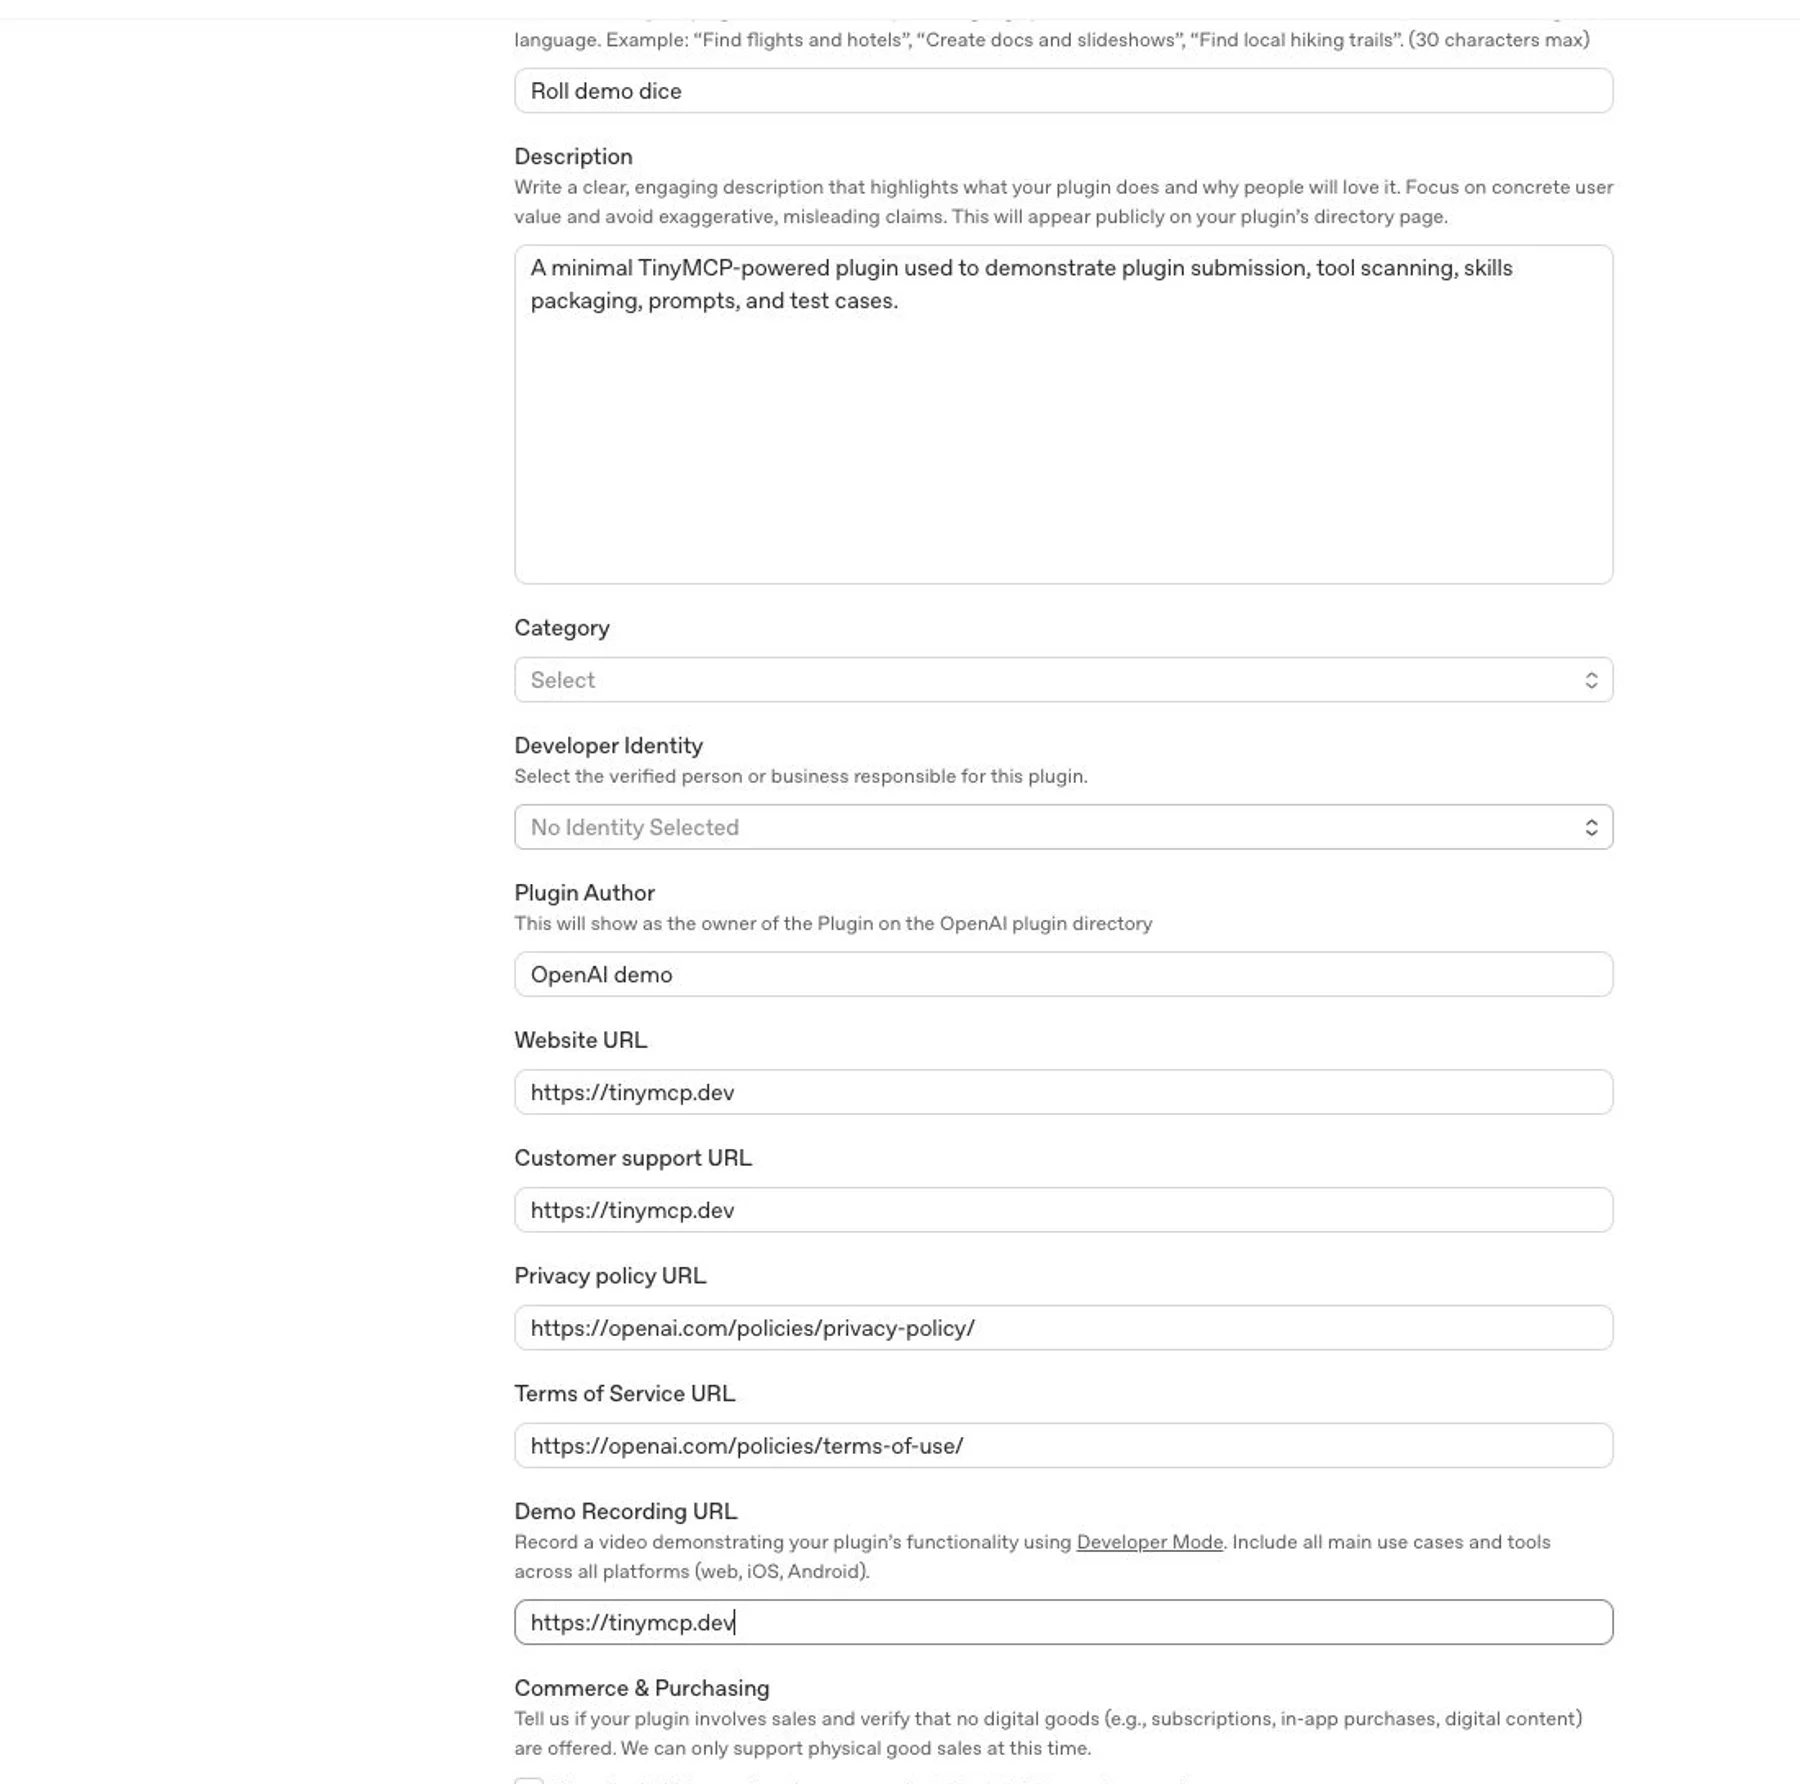
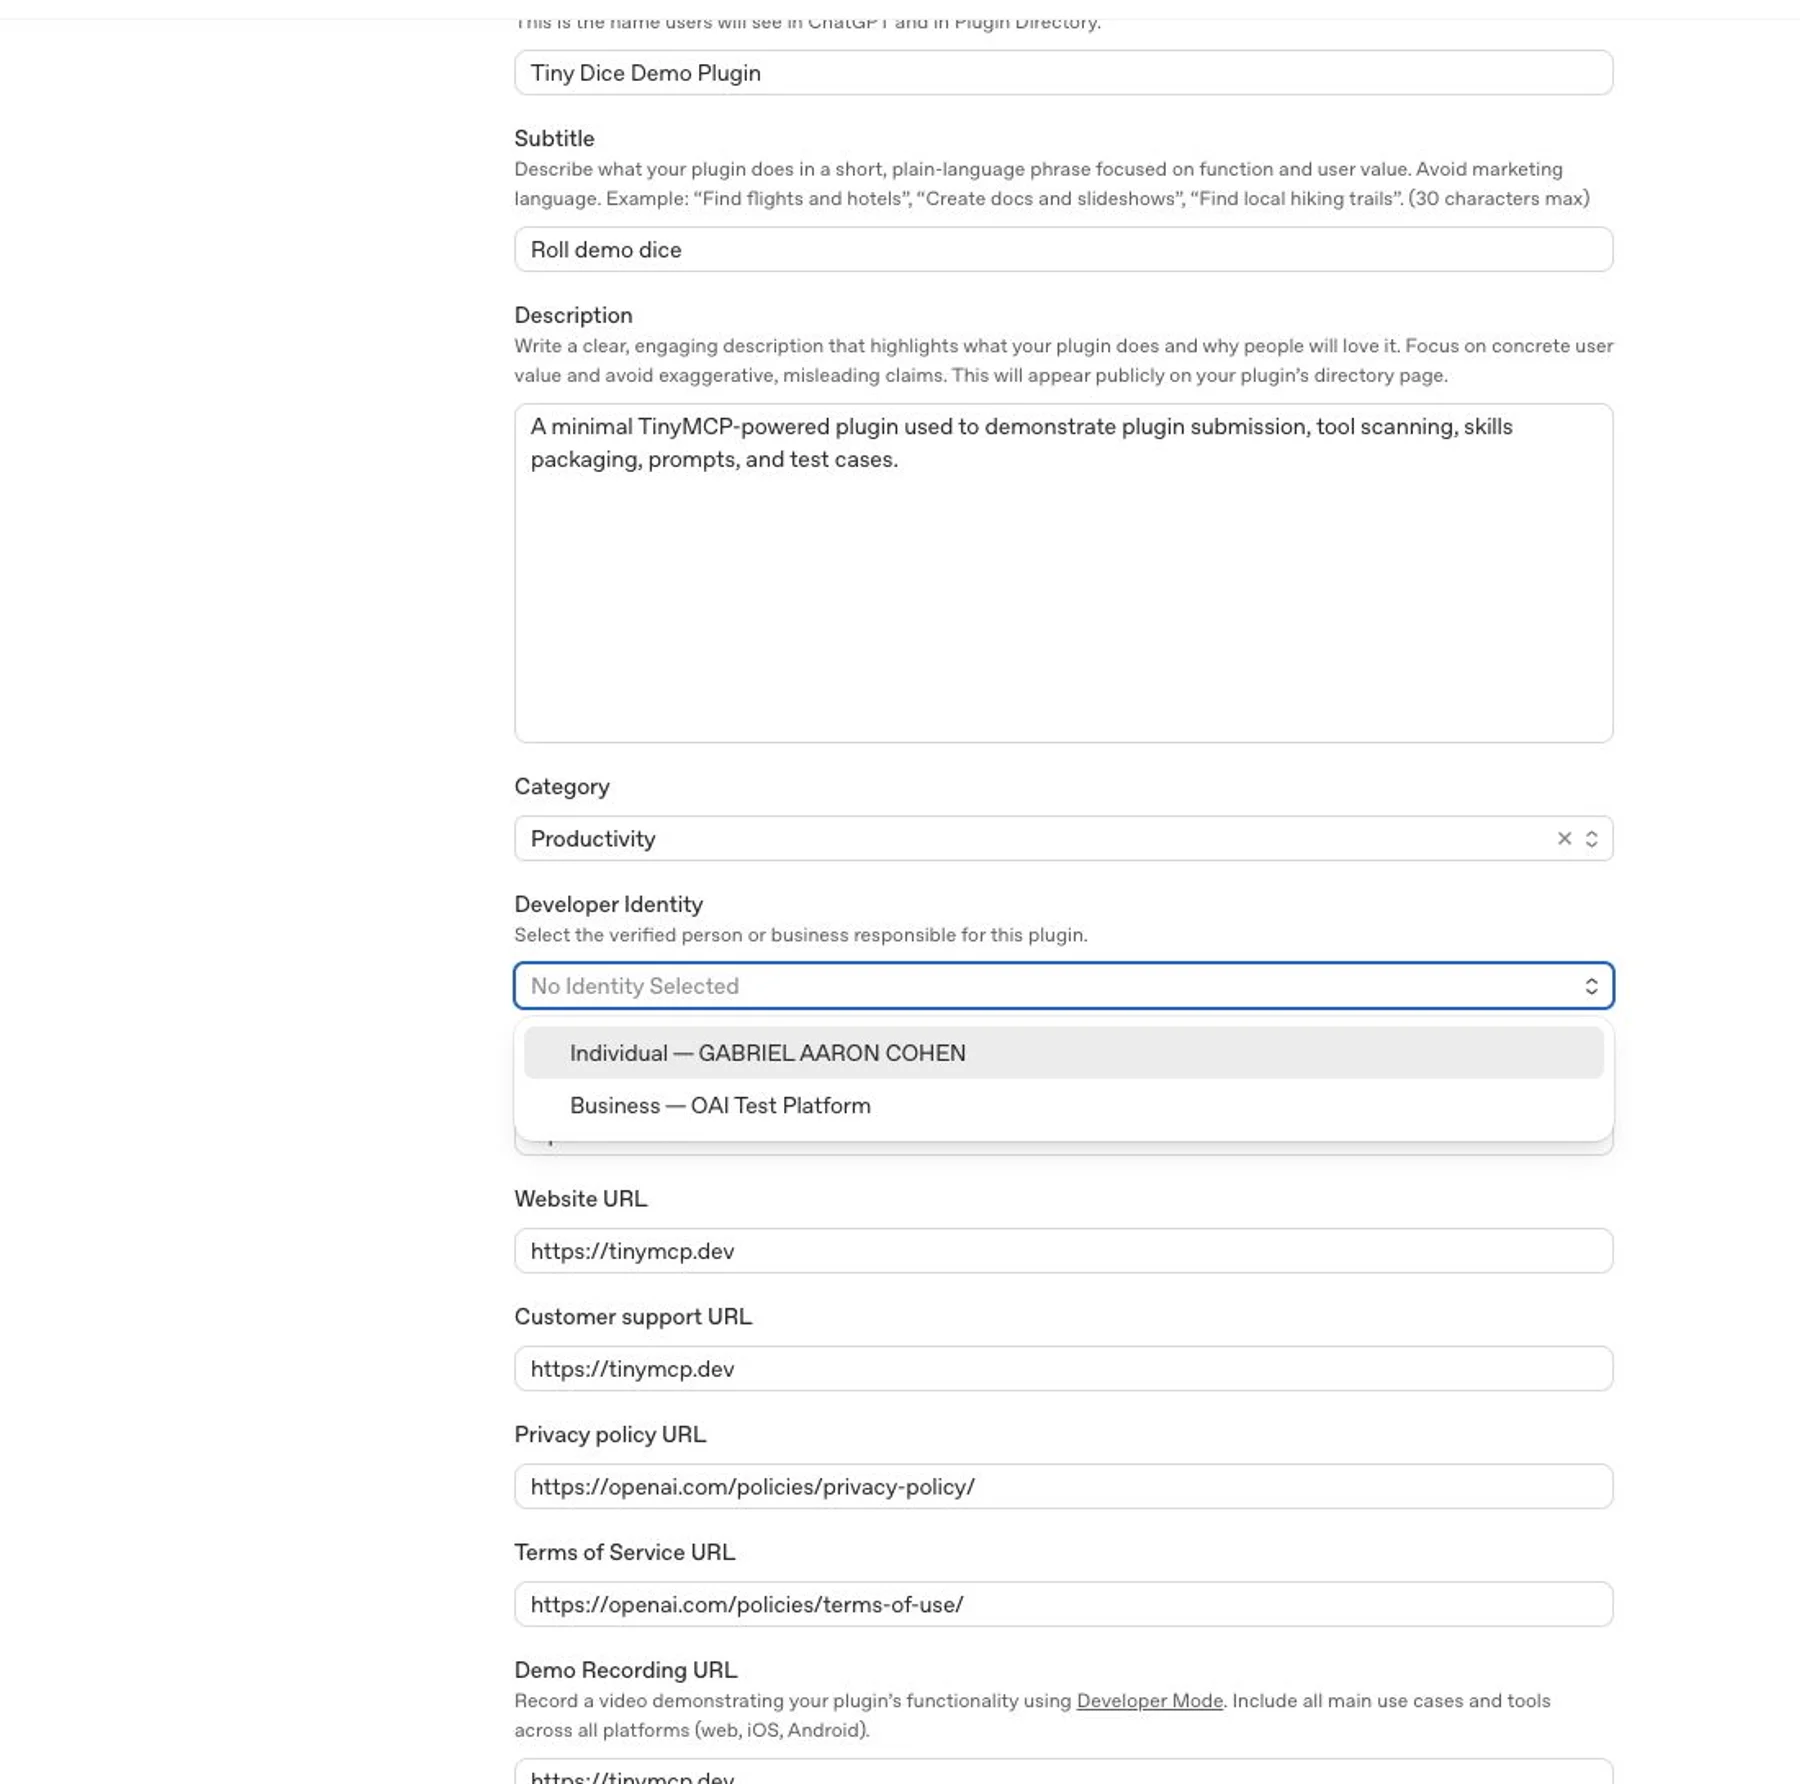
Review your MCP responses against your privacy policy before you submit. Remove unnecessary personal data, auth secrets, debug payloads, internal identifiers, and undisclosed user-related fields from tool responses.
MCP
For app or MCP submissions:
- Enter the production MCP server URL.
- Configure authentication and provide reviewer-ready demo credentials if the server requires sign-in.
- Define a content security policy that allows the exact domains your app fetches from.
- Complete domain verification if the portal shows a Domain not verified
challenge. Use an HTTPS origin on the MCP hostname or a parent hostname, and
host the exact token at
/.well-known/openai-apps-challenge. - Select Scan Tools.
- Review the discovered tools, domains, validation output, and tool metadata.
- Fix server or metadata issues, deploy the fix, then scan again.
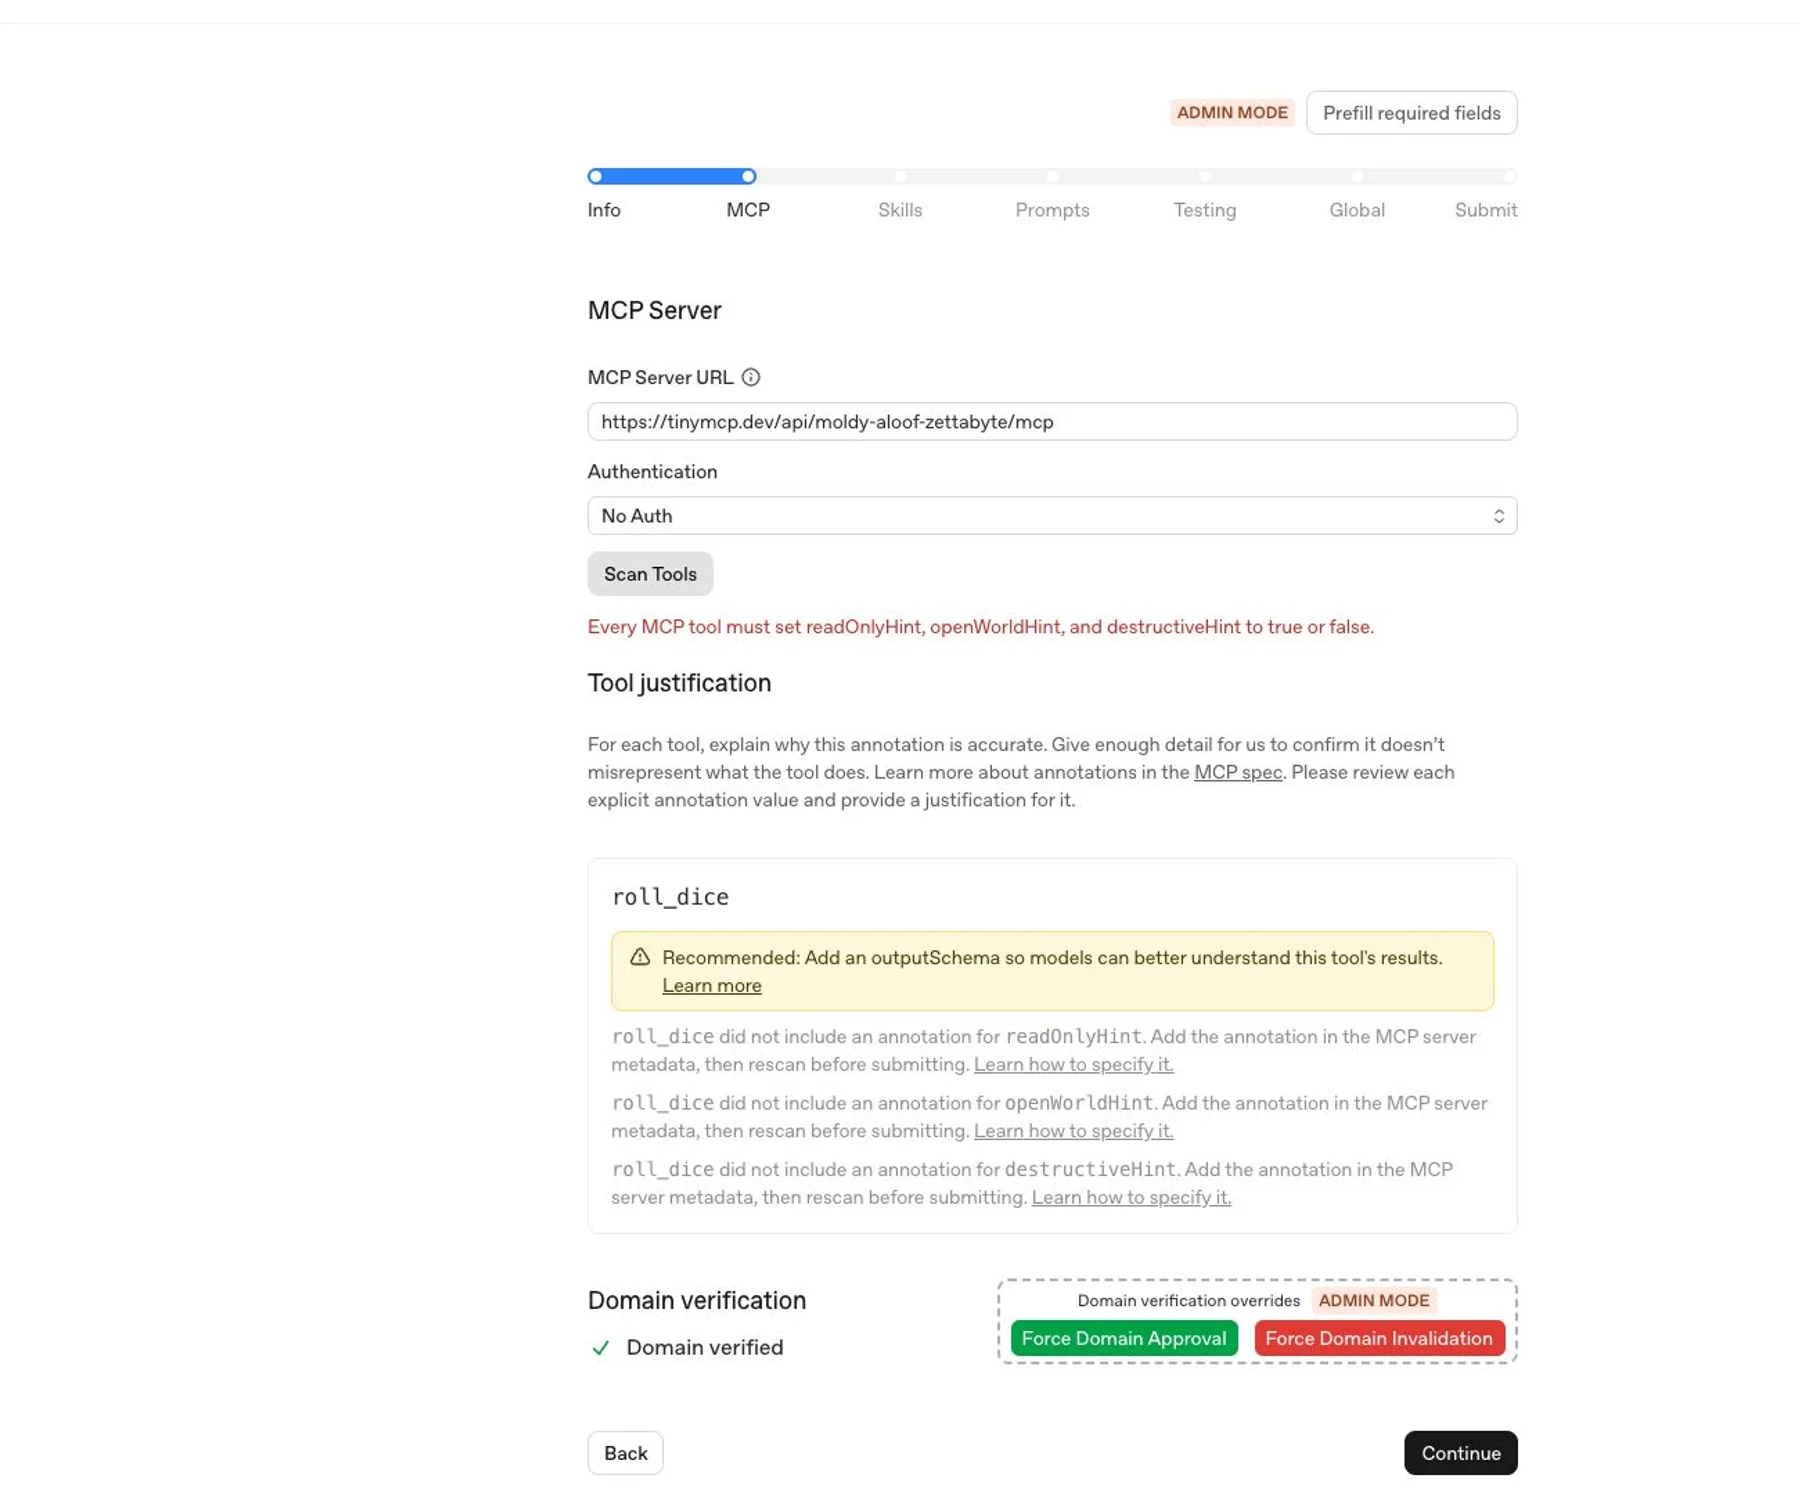
Do not enter a ChatGPT app ID or try to point the portal at an existing, published ChatGPT app. The submission must provide the MCP server URL and review materials directly, even when that server backs an app that is already published in ChatGPT.
Domain verification
Plugins that contain apps must verify control of the domain that hosts the app’s MCP server. When the portal shows a domain verification challenge, place the exact verification token at the generated well-known URL:
https://<challenge-base-host>/.well-known/openai-apps-challengeThe challenge endpoint must return only that plugin’s verification token. Do not return JSON, a list of tokens, or multiple tokens from the same URL.
The Challenge Base URL is an optional HTTPS origin that tells the portal
where to check the token. It must be the MCP hostname or a parent hostname.
Paths are ignored. For example, if the MCP server URL is
https://api.example.com/mcp, the default challenge URL is
https://api.example.com/.well-known/openai-apps-challenge, and
https://example.com can be used as a parent-origin challenge base if you can
host the token there.
If two plugins that contain apps share the same MCP hostname but differ only by path, they also share the same default challenge URL. You cannot verify them separately by putting different tenant paths in the Challenge Base URL, because the path is ignored. Use a parent origin that can host the new token, give the app’s MCP server a distinct hostname, or work with OpenAI support if neither hosting option is possible.
If another plugin that contains an app already uses the same MCP hostname, do not replace its existing challenge token unless that plugin no longer needs it. Use an allowed parent-origin Challenge Base URL or a distinct MCP hostname for the new submission.
Every tool should have clear names, descriptions, schemas, and output structure. Add output schemas when they help reviewers and models understand what the tool returns.
Set tool annotations to match each tool’s real behavior:
| Annotation | Use it when |
|---|---|
readOnlyHint | Set to true only when the tool fetches, looks up, lists, retrieves, previews, or computes information and doesn’t change anything. Set to false if the tool can create, update, delete, send, enqueue, run jobs, start workflows, write logs, or otherwise change state. |
openWorldHint | For write tools, set to true if the tool can change publicly visible internet state, such as posting online, sending external messages, publishing content, pushing code, or submitting forms to third parties. Set to false only if the tool operates entirely within closed or private systems and can’t change publicly visible internet state. |
destructiveHint | For write tools, set to true if the tool can delete, overwrite, revoke access, send messages or transactions that can’t be undone, or cause another irreversible side effect. Otherwise, set it to false. |
For implementation details, see tool annotations and elicitation. For review expectations, see the Apps SDK tool hint rejection guidance.
Skills
Upload the final skill bundle for skills-only or app-plus-skills submissions. Use the same file tree and instructions you tested locally.
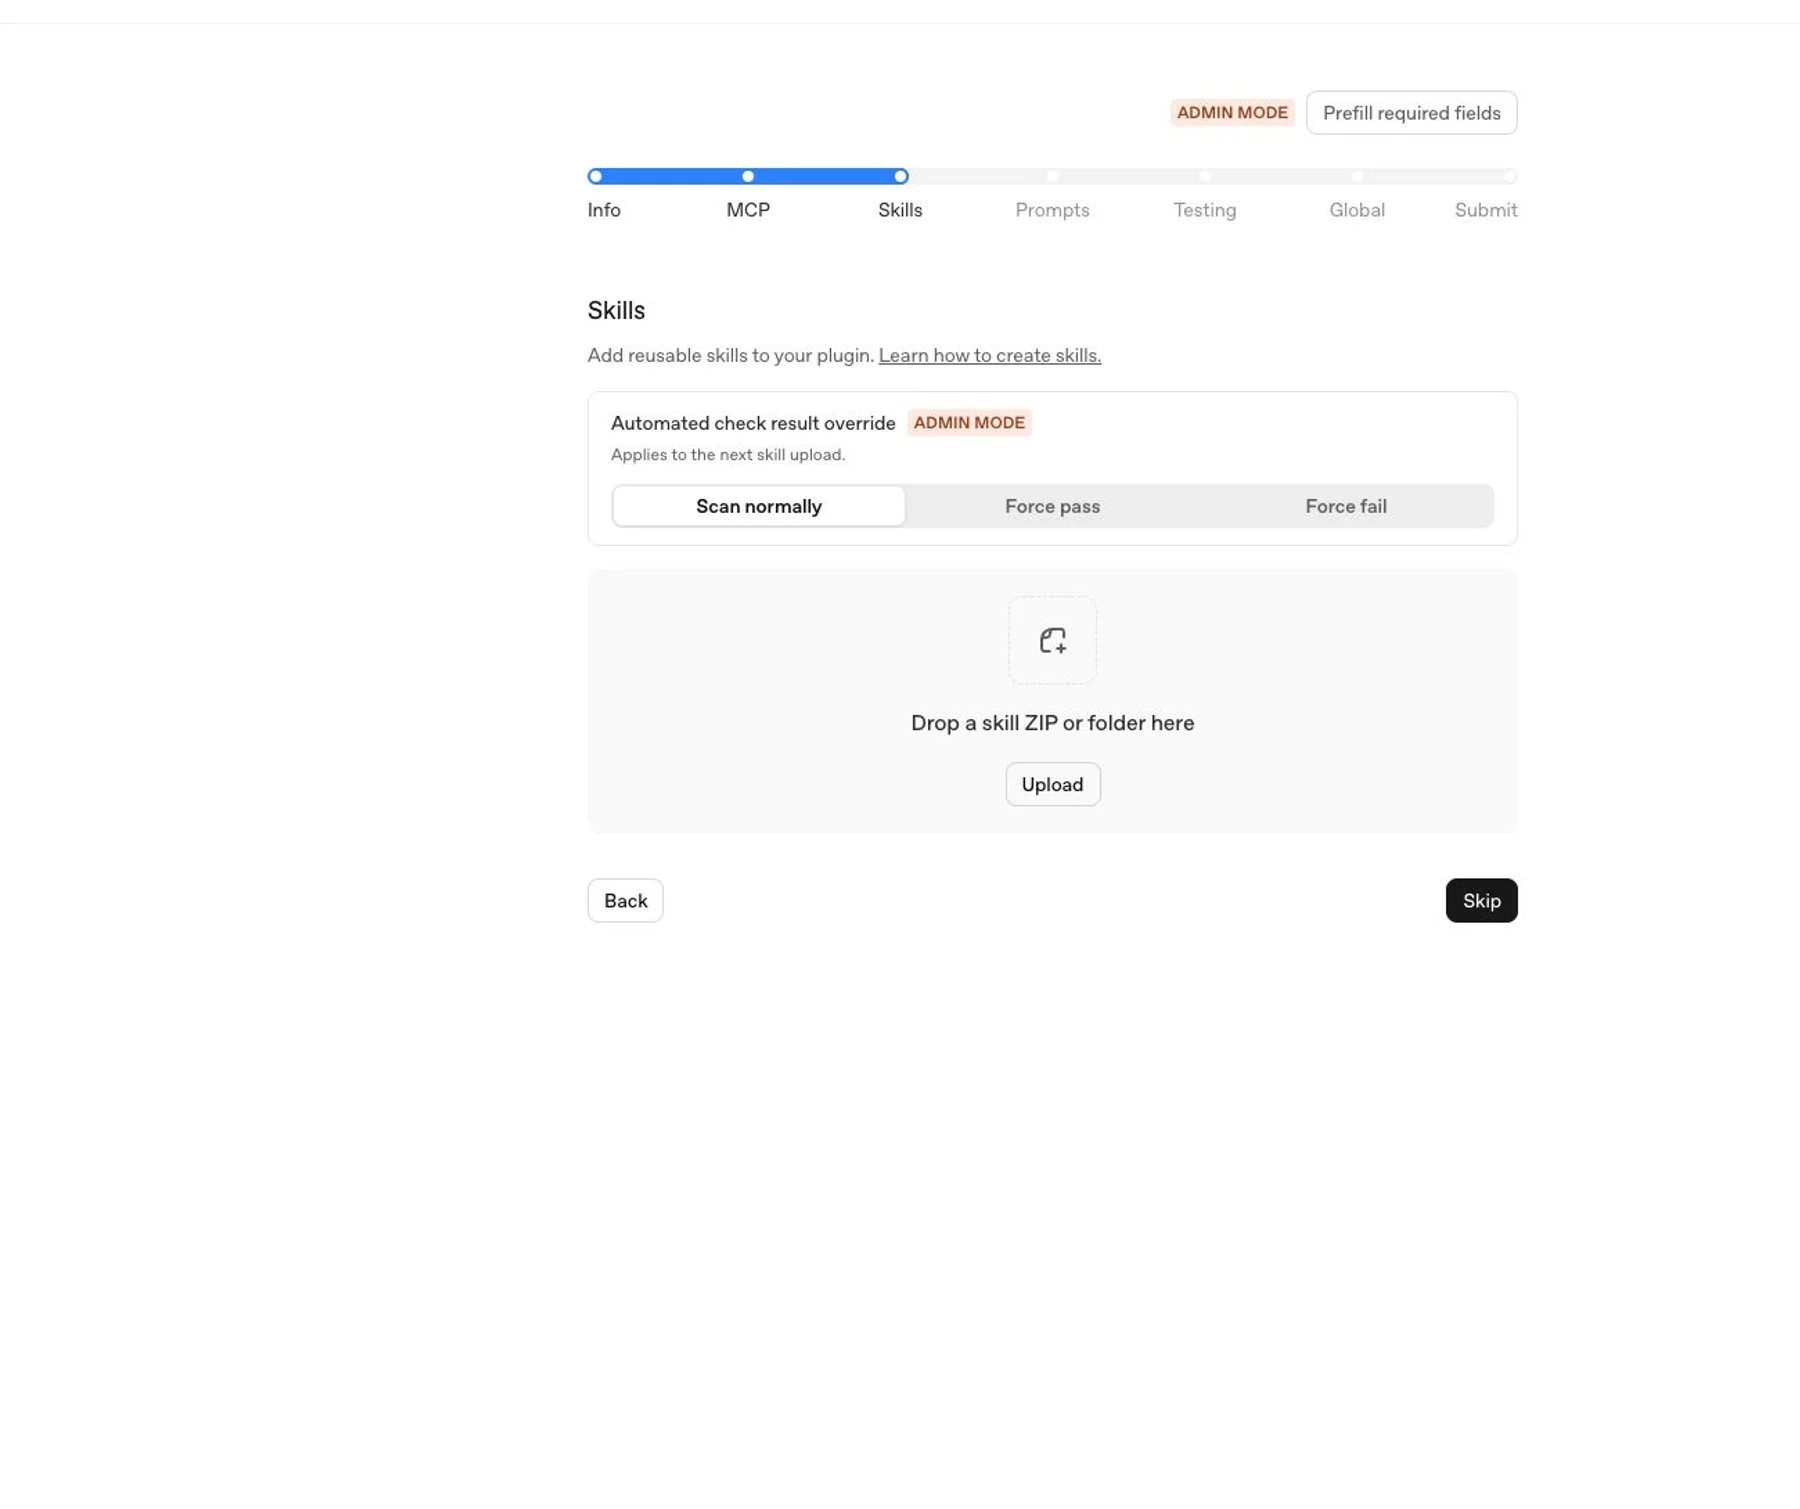
Each skill should include:
- A clear
SKILL.mdwith trigger conditions and task instructions. - Any referenced scripts, templates, or assets.
- Minimal, scoped instructions that fit the plugin’s purpose.
Uploaded skills are scanned for policy compliance and security risks, including sensitive information, unnecessary access requests, and instructions that may conflict with safe or expected plugin behavior. Skills must follow the same standards as the rest of the plugin and may block submission or require remediation if they fail automated scanning.
Prompts
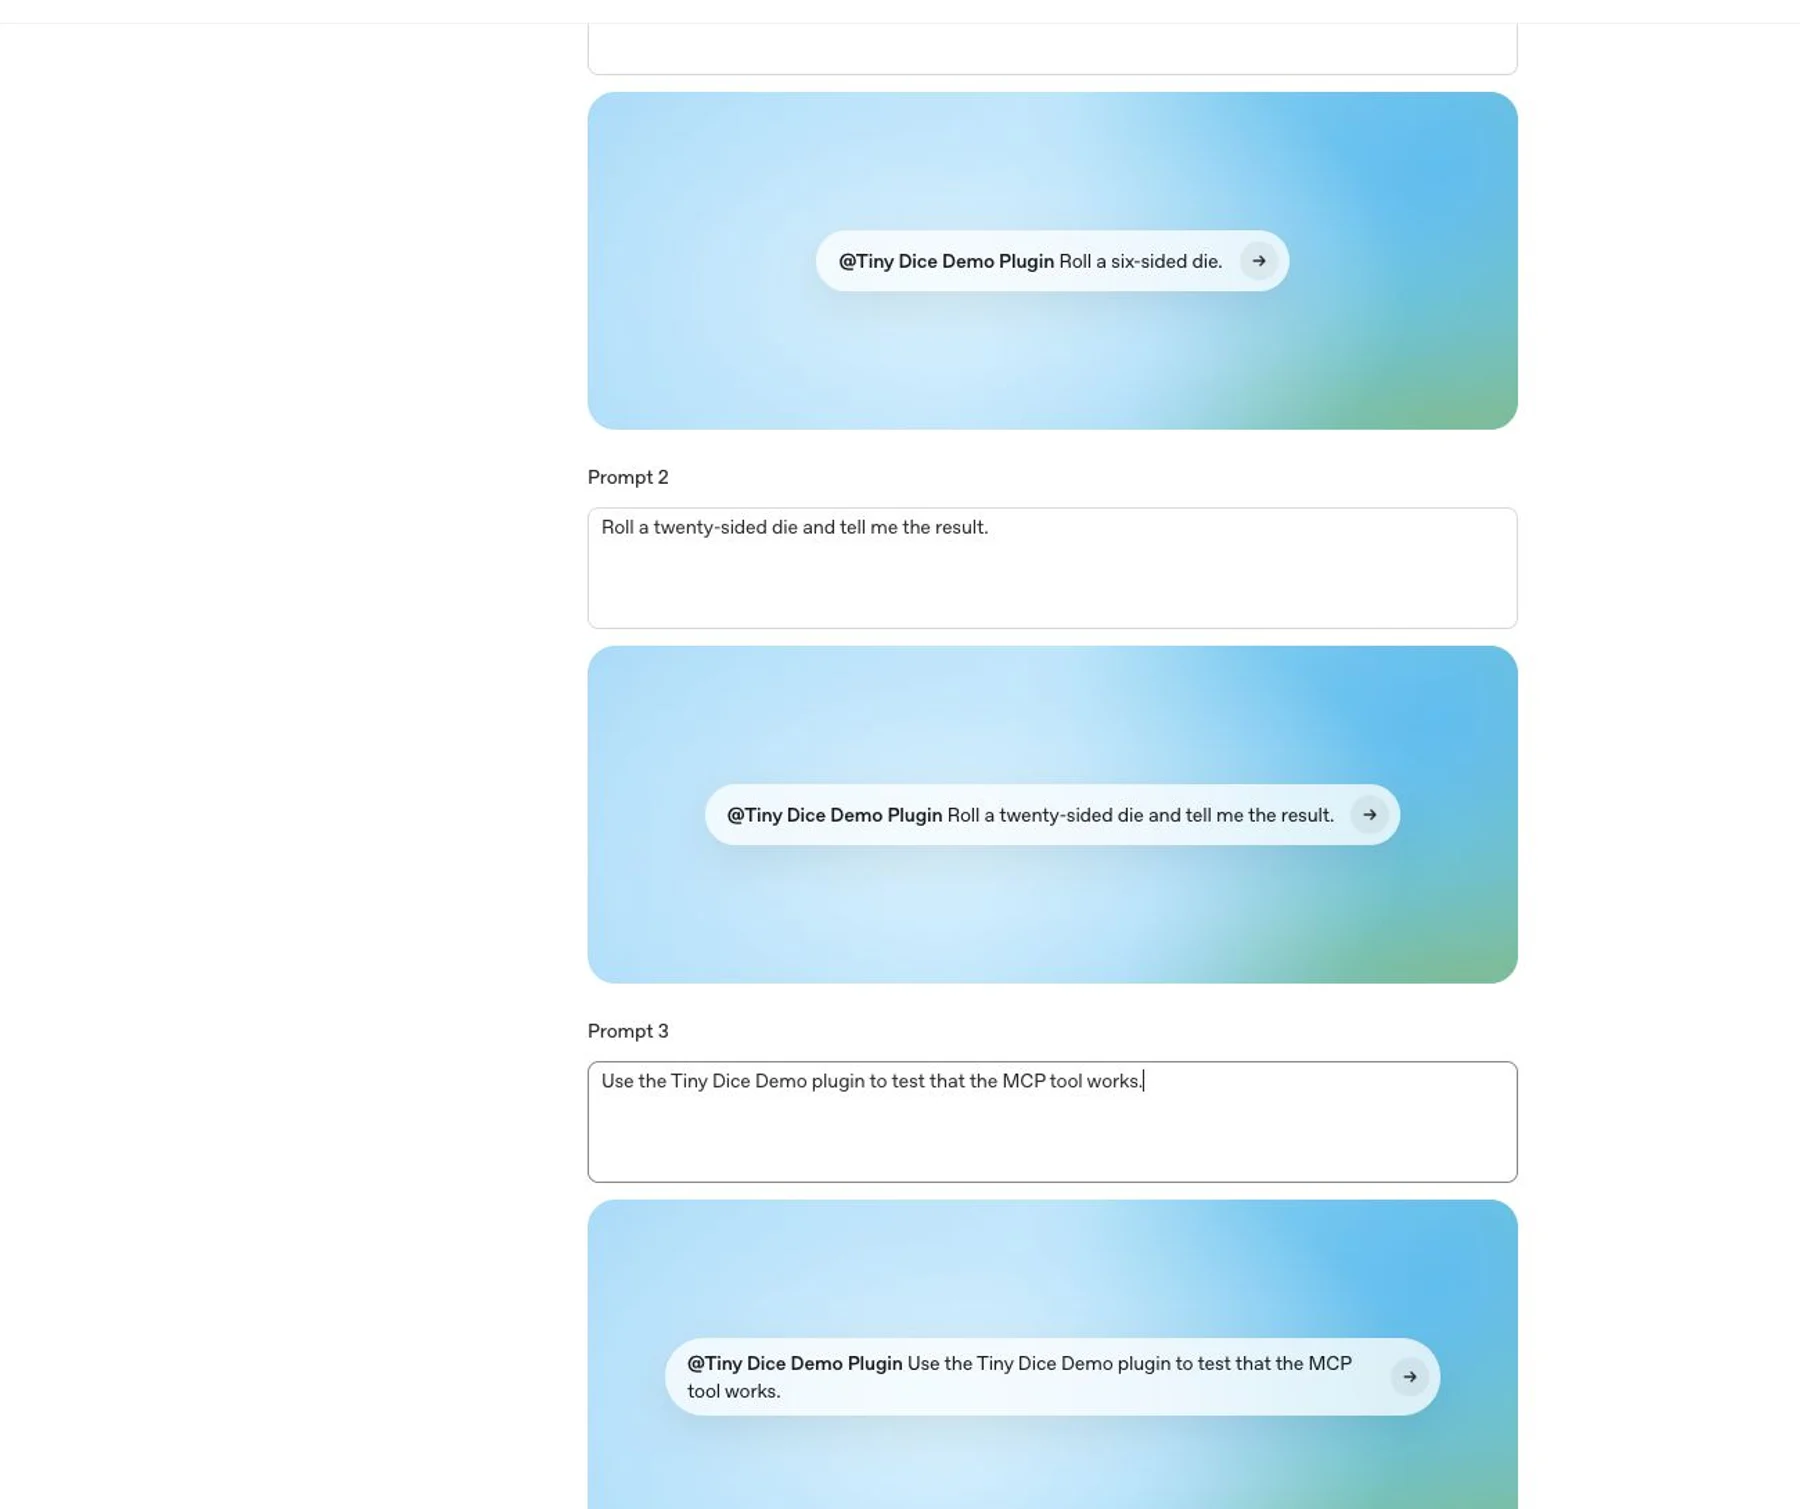
Add starter prompts that show the plugin’s highest-value workflows. Good prompts are specific enough to show when to use the plugin, but general enough that users can adapt them.
Examples:
- “Investigate checkout errors from the last release and summarize likely root causes.”
- “Create a P1 incident brief from the latest support tickets and related deploys.”
- “Review unsuccessful deployment logs and recommend the next debugging step.”
Testing
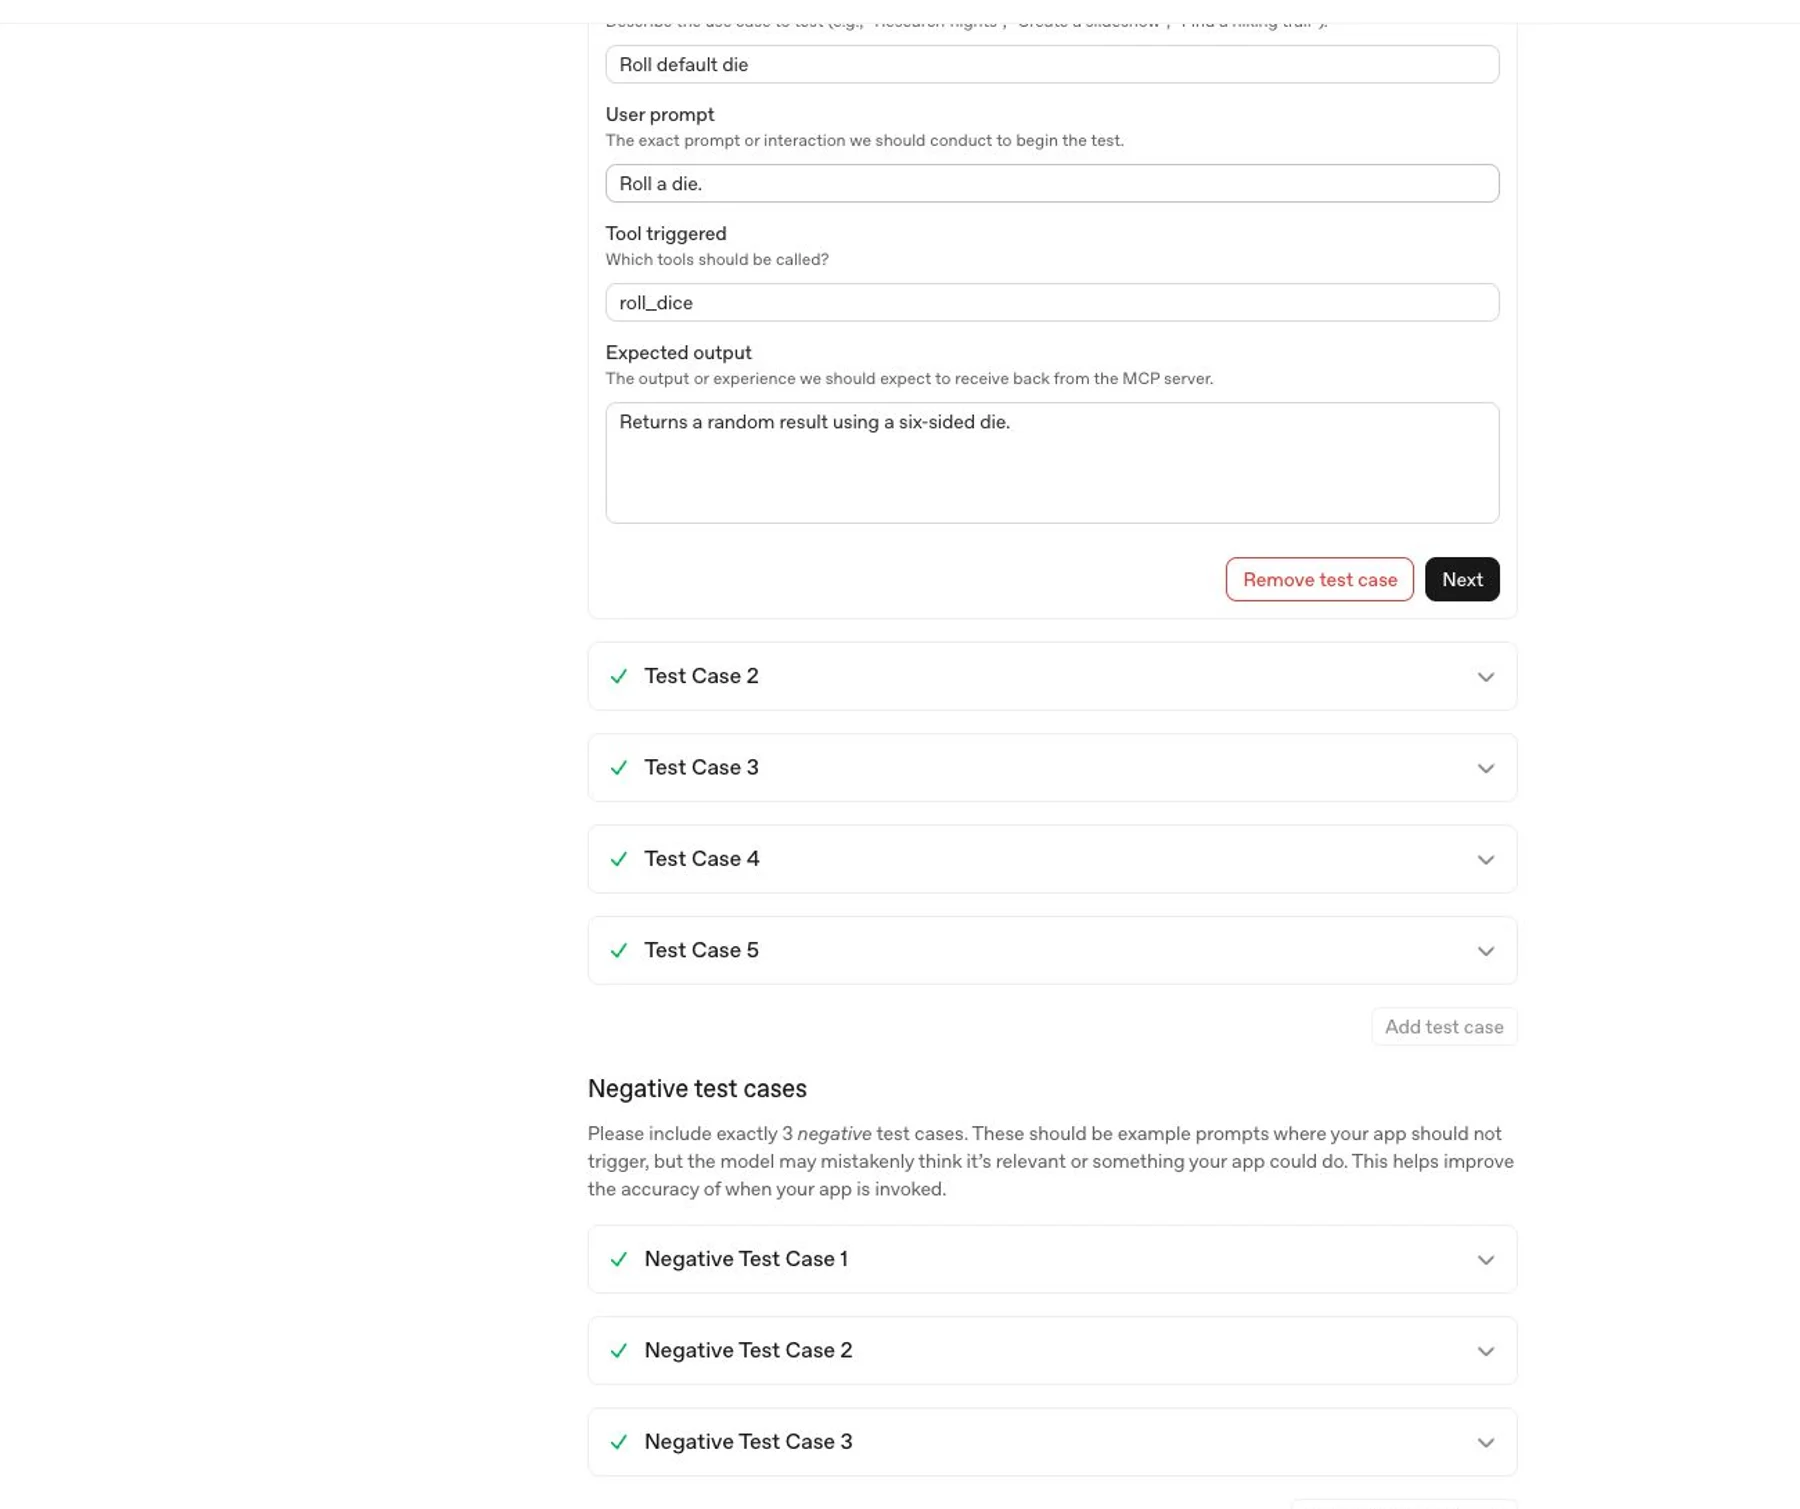
Submit exactly five positive test cases and three negative test cases.
For each positive test case, include:
- User prompt.
- Expected tool, skill, or workflow behavior.
- Expected result shape.
- Test account or fixture data required to reproduce it.
For each negative test case, include:
- User prompt or scenario.
- Expected refusal, clarification, or safe fallback behavior.
- Why the plugin shouldn’t complete the requested action.
Use test cases that reviewers can run without internal context. If your plugin requires authentication, make sure the provided demo credentials can complete each test without MFA, SMS, email confirmation, or private-network access.
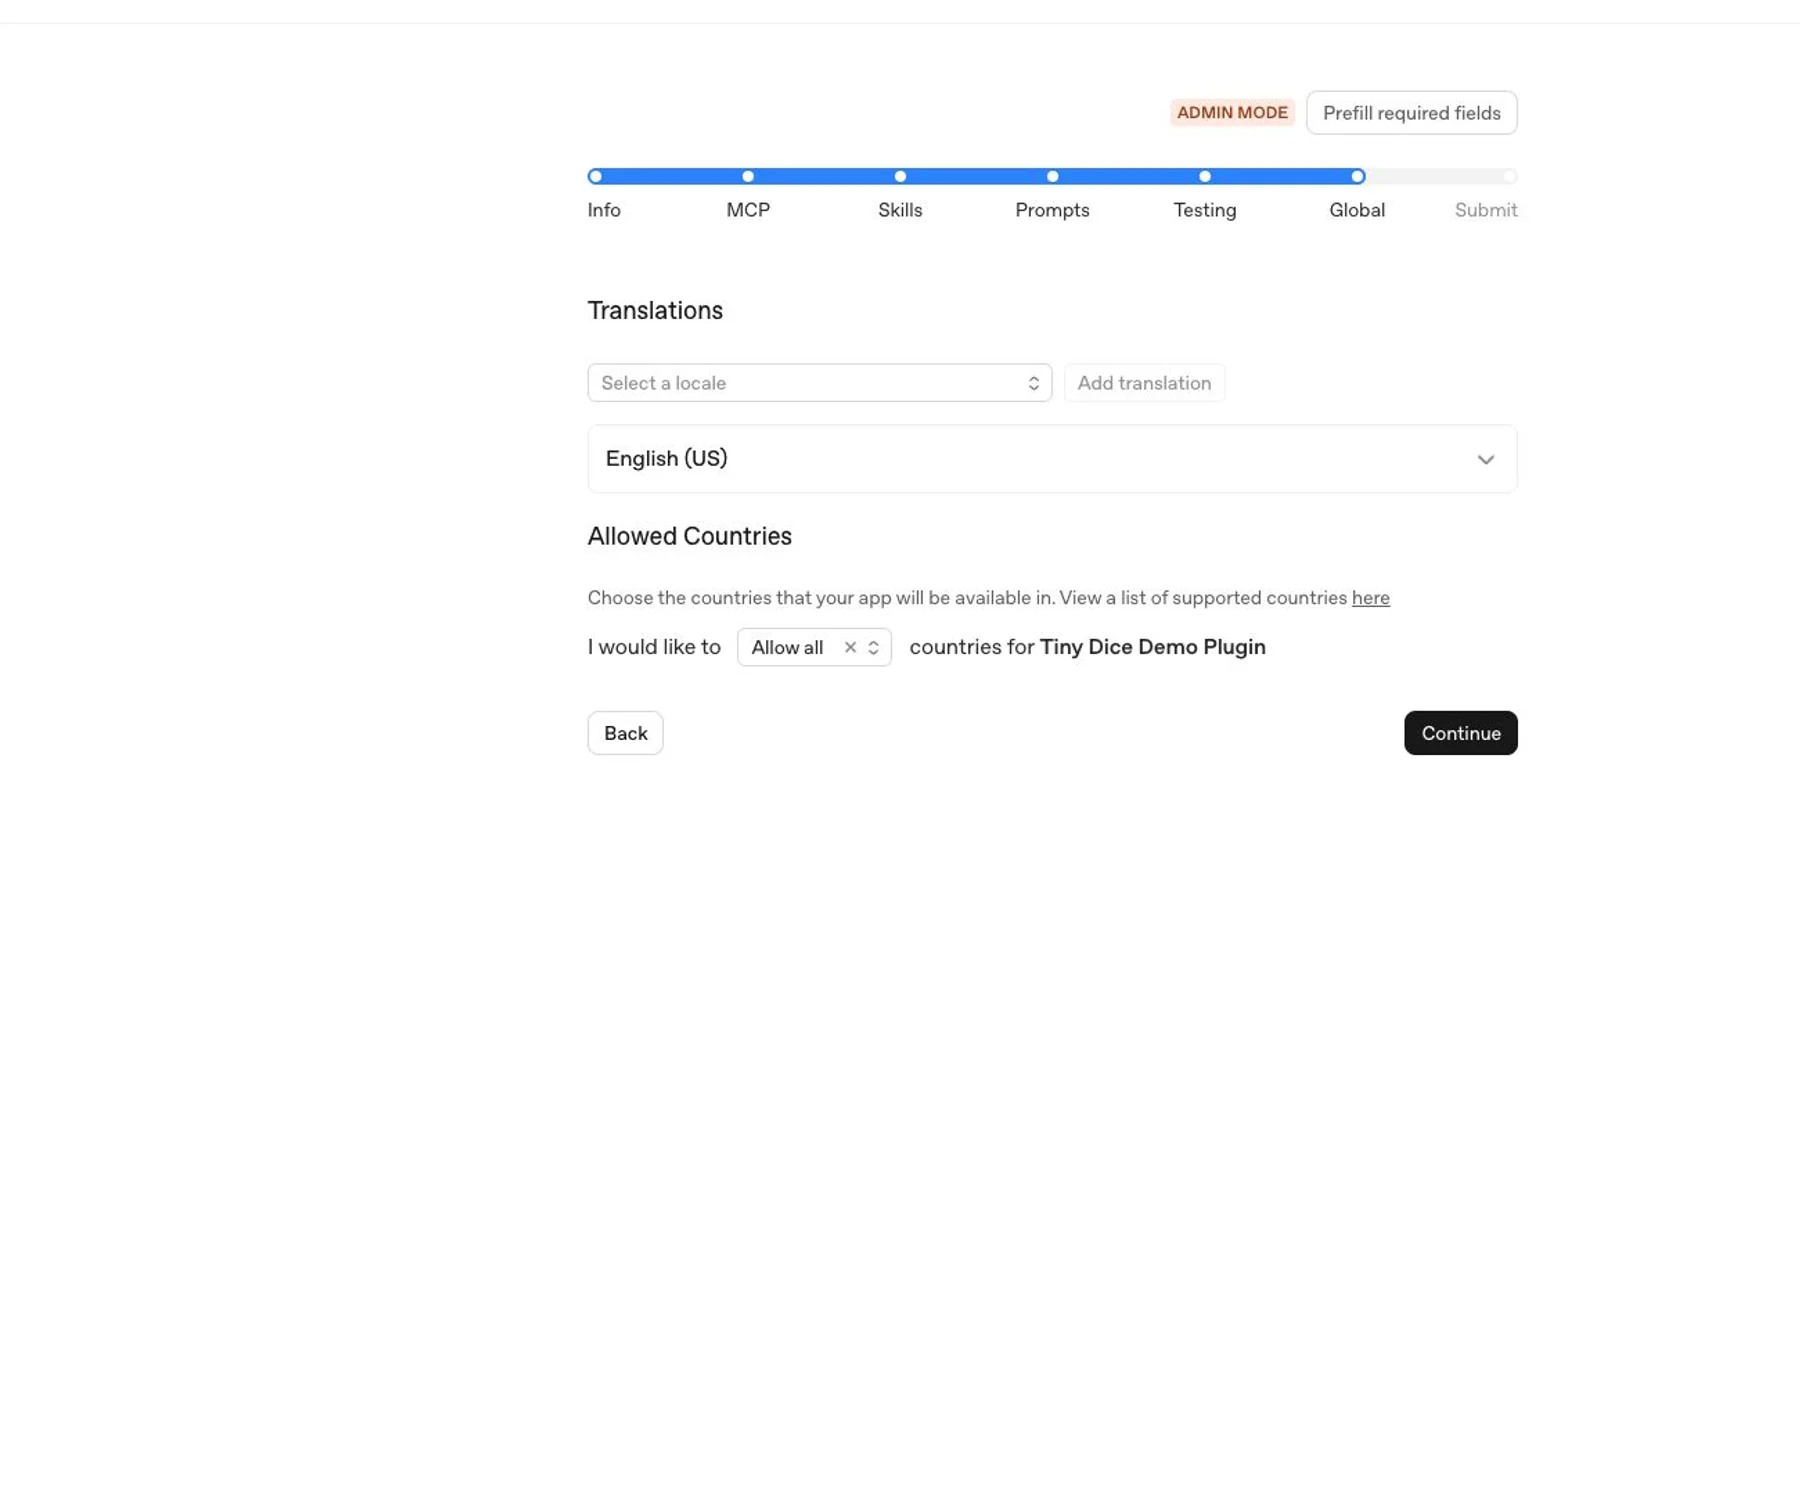
Global
Choose the countries or regions where the plugin should be available. Only select locations where the publisher, product, support process, and legal terms are ready for users.
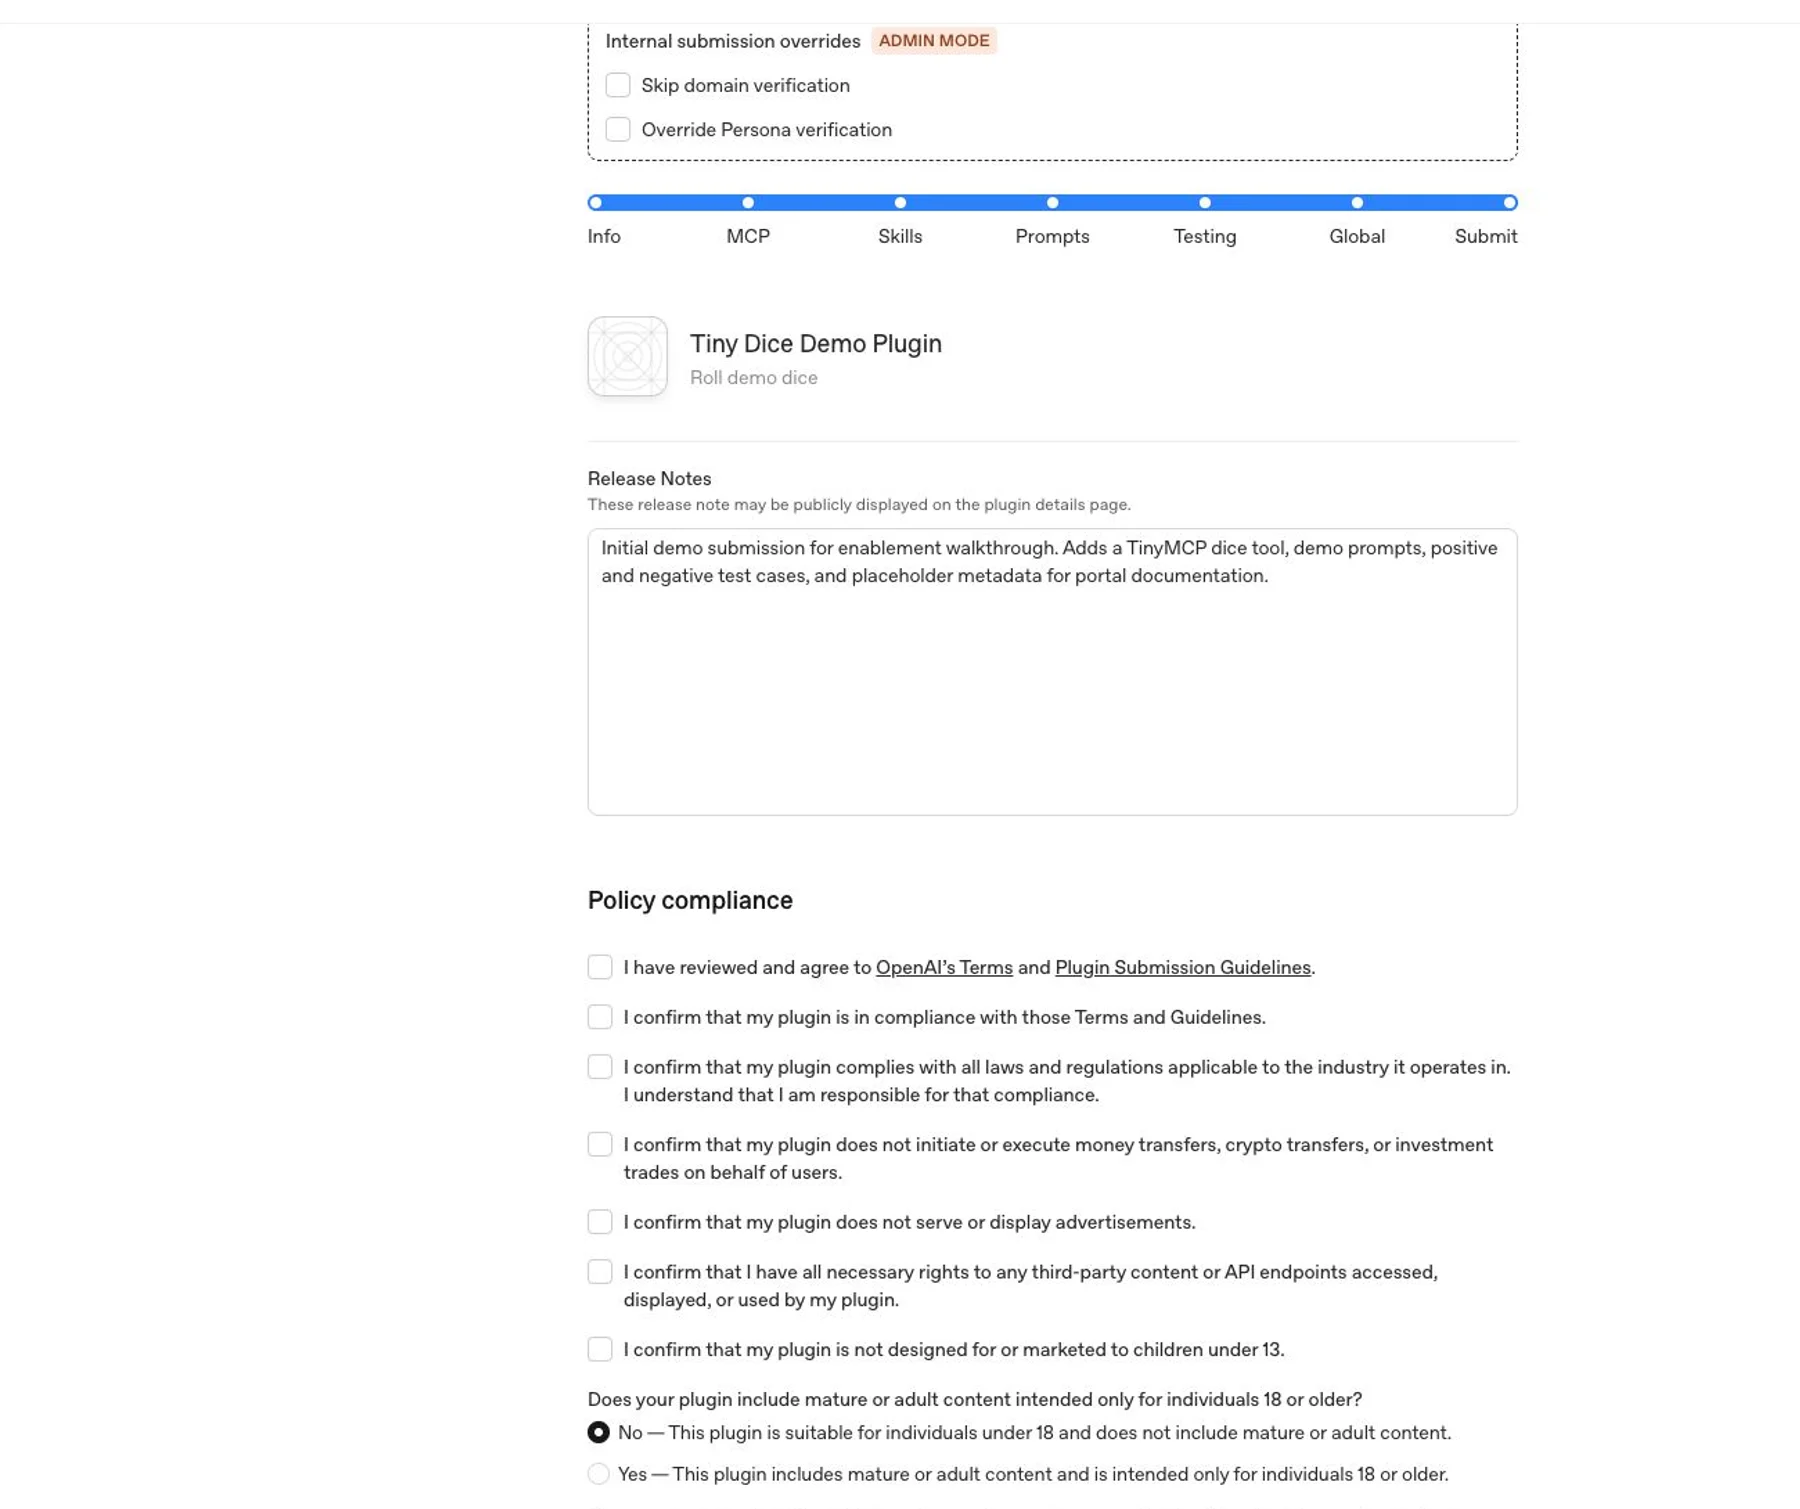
Submit
Review the full draft before submitting.
In the release notes, summarize:
- What the plugin does.
- Whether this is an initial submission or an update.
- What changed since the prior submitted version, if any.
- Anything reviewers should know about test credentials, expected data, or setup.
Complete the policy attestations only after confirming the listing, server, skills, prompts, tests, and availability are accurate. Then select Submit for Review.
Public publishing flow
Submitting a plugin starts review; it doesn’t publish the plugin immediately. For public availability, the flow is:
- Submit the plugin through the plugin submission portal.
- OpenAI reviews the submission. Review timelines may vary as OpenAI builds and scales the review process.
- After OpenAI approves the plugin, the developer chooses when to publish it and publishes it from the portal.
- After publication, the plugin appears in the universal plugin directory available in both ChatGPT and Codex.
No separate apps directory exists. Published apps, skills-only plugins, and app-plus-skills plugins all appear in the plugin directory.
Final checklist
Before submitting, confirm:
- The submitter has Apps Management write access.
- The publisher has a verified developer or business identity.
- The MCP server uses a public, production URL.
- Plugins that contain apps define a content security policy for the exact domains the app fetches from.
- Reviewer credentials work without MFA, email confirmation, SMS confirmation, or private-network access.
- Tool names, descriptions, schemas, and annotations match actual behavior.
- Every tool has accurate
readOnlyHint,openWorldHint, anddestructiveHintvalues. - Tool responses don’t include unnecessary personal data, auth secrets, debug payloads, internal identifiers, or undisclosed user-related fields.
- You tested the skills locally with the final file tree.
- Starter prompts show realistic user workflows.
- The submission includes five positive and three negative test cases.
- Privacy policy, terms, support, and website URLs are public and match the publisher identity.